PowerShell Pipeline
Encrypting Data with PowerShell Cmdlets
Here are three commands you can use to encrypt and decrypt data.
Encrypting data in today's day and age is pretty important if you want to keep things secret without the threat of someone else viewing things such as passwords, personably identifiable information or some other piece of data that you don't want to have openly available in clear text. Of course, if someone wants to get your data and has enough time and resources, they will find a way to get it. But we can certainly make it more challenging by encrypting the data using the cmdlets available in PowerShell V5.
There are three commands which make up the Cryptographic Message System (CMS) set of cmdlets that you can use to encrypt and decrypt data. These cmdlets make use of a public key cryptography where there is a public key (which you use for the encryption) and a private key (which is used for the decryption). The public key, as the name implies, can be given out to allow others to encrypt the data but the private key is something that you want to keep a tight hold on. If someone whom you do not trust gains access to this private key, they can use it to decrypt all of your data. If you want to enjoy some light reading, you can read up on the CMS RFC here.
The three cmdlets which are available to use are Protect-CMSMessage, UnProtect-CMSMessage and Get-CMSMessage. Protect-CMSMessage is what you will use to encrypt the data which would then be saved to a file and can only be decrypted using the UnProtect-CMSMessage cmdlet. Using Get-CMSMessage, you can view more data about the encrypted document such as who can decrypt it.
Before we can start working with these cmdlets, we should build out a certificate that will support the encryption that we intend to do. For this, I will create a .inf file which will then be used in my certificate request to generate an encryption certificate.
@'

  [Version]

Signature = "$Windows NT$"
[Strings]

  szOID_ENHANCED_KEY_USAGE = "2.5.29.37"

szOID_DOCUMENT_ENCRYPTION = "1.3.6.1.4.1.311.80.1"
[NewRequest]

  Subject = "[email protected]"

  MachineKeySet = false

  KeyLength = 2048

  KeySpec = AT_KEYEXCHANGE

  HashAlgorithm = Sha1

  Exportable = true

  RequestType = Cert

  KeyUsage = "CERT_KEY_ENCIPHERMENT_KEY_USAGE |  CERT_DATA_ENCIPHERMENT_KEY_USAGE"

  ValidityPeriod = "Years"

ValidityPeriodUnits = "1000"
[Extensions]

  %szOID_ENHANCED_KEY_USAGE% =  "{text}%szOID_DOCUMENT_ENCRYPTION%"

  '@ | Out-File -FilePath EncryptCert.inf
certreq.exe -new EncryptCert.inf EncryptCert.cer
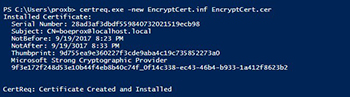 [Click on image for larger view.] Figure 1.
Note the Subject line as this is where you would replace my information with your own. This is important when encrypting your data to supply this subject so the cmdlet knows which certificate to use.
Let's verify that the certificate is loaded into my user's certificate store.
Get-ChildItem -Path Cert:\CurrentUser\My -DocumentEncryptionCert
 [Click on image for larger view.] Figure 2.
Now that we have an encryption certificate created and loaded into our certificate store, we can begin encrypting data and then attempt to decrypt it.
$Text = 'This is some information that we should encrypt so no one else can read it!'
Protect-CmsMessage -To '[email protected]' -Content $Text -OutFile MyEncryptedDoc.txt
Note that the –To parameter is where I will specify the exact subject line that I specified when creating the request file for the encryption certificate. This does include using the 'cn=' part. My –Content parameter is the actual data that will be encrypted while the –OutFile specifies the location of the encrypted text file.
Viewing the document using Get-Content will show us nothing useful other than the encrypted data.
Get-Content .\MyEncryptedDoc.txt

  -----BEGIN CMS-----

  MIIB6gYJKoZIhvcNAQcDoIIB2zCCAdcCAQAxggFSMIIBTgIBADA2MCIxIDAeBgNVBAMMF2JvZXBy

  b3hAbG9jYWxob3N0LmxvY2FsAhAorTrz299VmEBzICFRnsuYMA0GCSqGSIb3DQEBBzAABIIBAEsy

  1SVd/0g/6fNkaeaAiMaE3EyOWYWmA02dT/Ul8k4HqinWP48lJgn3N0y39BNmsxmk8YZUZJCpCtxn

  I8Ikuc/OghAQw9RWNoDK6r4rWzVhPcUPKReGF6qwMhueoVnePdZIUJ5DFvtvAHT7t5Nb35AiT+T3

  dqOSxRe9qdYfo/ElrB6sBjvSsS3UKv+pcpG2IT9N5sSrPsXxO6HLYKNbefMSn0jK+OMgS0wKuceU

  LZQ7k2XDKZ7cVM8pRwISNShiPWsCNyoff4HpnFNu6kn4Wx5+QGSMELpcLh2DXfV7Y3BIL3YO0Yyx

  dWYuIi0DuckoNYrXP+BBroRLiMKPwL1jtKEwfAYJKoZIhvcNAQcBMB0GCWCGSAFlAwQBKgQQAfY4

  qSmpQeJYe5zUUokbuYBQod//9Ah452K8/lRdn7SRCCFLmtWefmZbJv28wRAtI36cGEIvGn2y6a0r

  9Yj8mkhjvLZedEBp+xOZscanlEr+rOE7pAaqZaeO1DP7WtqglKo=

-----END CMS-----
Not exactly something useful to a person that doesn't have the private key to read the data. We can make use of the Get-CMSMessage cmdlet to find out more information about this encrypted document.
Get-CmsMessage -Path .\MyEncryptedDoc.txt

  Recipients                  : {[email protected]}

  Content                     : -----BEGIN CMS-----

  MIIB6gYJKoZIhvcNAQcDoIIB2zCCAdcCAQAxggFSMIIBTgIBADA2MCIxIDAeBgNVBAMMF2JvZXBy

  b3hAbG9jYWxob3N0LmxvY2FsAhAorTrz299VmEBzICFRnsuYMA0GCSqGSIb3DQEBBzAABIIBAEsy

  1SVd/0g/6fNkaeaAiMaE3EyOWYWmA02dT/Ul8k4HqinWP48lJgn3N0y39BNmsxmk8YZUZJCpCtxn

  I8Ikuc/OghAQw9RWNoDK6r4rWzVhPcUPKReGF6qwMhueoVnePdZIUJ5DFvtvAHT7t5Nb35AiT+T3

  dqOSxRe9qdYfo/ElrB6sBjvSsS3UKv+pcpG2IT9N5sSrPsXxO6HLYKNbefMSn0jK+OMgS0wKuceU

  LZQ7k2XDKZ7cVM8pRwISNShiPWsCNyoff4HpnFNu6kn4Wx5+QGSMELpcLh2DXfV7Y3BIL3YO0Yyx

  dWYuIi0DuckoNYrXP+BBroRLiMKPwL1jtKEwfAYJKoZIhvcNAQcBMB0GCWCGSAFlAwQBKgQQAfY4

  qSmpQeJYe5zUUokbuYBQod//9Ah452K8/lRdn7SRCCFLmtWefmZbJv28wRAtI36cGEIvGn2y6a0r

  9Yj8mkhjvLZedEBp+xOZscanlEr+rOE7pAaqZaeO1DP7WtqglKo=

-----END CMS-----
 Version                    : 0

  ContentInfo                 : System.Security.Cryptography.Pkcs.ContentInfo

  ContentEncryptionAlgorithm :  System.Security.Cryptography.Pkcs.AlgorithmIdentifier

  Certificates                : {}

  UnprotectedAttributes       : {}

  RecipientInfos              : {75 50 213 37 93 255 72 63  233 243 100 105 230 128 136 198 132 220 76 142 89

  133 166 3 77 157 79 245 37 242 78 7 170 41 214 63 143 37 38 9 247 55 76  183

  244 19 102 179 25 164 241 134 84 100 144 169 10 220 103 35 194 36 185  207 206

  130 16 16 195 212 86 54 128 202 234 190 43 91 53 97 61 197 15 41 23 134  23 170

  176 50 27 158 161 89 222 61 214 72 80 158 67 22 251 111 0 116 251 183  147 91

  223 144 34 79 228 247 118 163 146 197 23 189 169 214 31 163 241 37 172  30 172

  6 59 210 177 45 212 42 255 169 114 145 182 33 63 77 230 196 171 62 197  241 59

  161 203 96 163 91 121 243 18 159 72 202 248 227 32 75 76 10 185 199 148  45 148

  59 147 101 195 41 158 220 84 207 41 71 2 18 53 40 98 61 107 2 55 42 31  127 129

  233 156 83 110 234 73 248 91 30 126 64 100 140 16 186 92 46 29 131 93  245 123

  99 112 72 47 118 14 209 140 177 117 102 46 34 45 3 185 201 40 53 138 215  63

224 65 174 132 75 136 194 143 192 189 99 180 161}
Here we can see information such as the recipients and the encrypted data (still encrypted).
Using the private key, we can choose to either pipe this output from Get-CMSMessage to Unprotect-CMSMessage and specify the private key (still '[email protected]') or make use of the –FilePath parameter and decrypt it that way. In my example below, I will pipe the output of Get-CMSMessage to decrypt the message.
Get-CmsMessage -Path .\MyEncryptedDoc.txt |
 Unprotect-CmsMessage -To '[email protected]'
 [Click on image for larger view.] Figure 3.
As you can see, I was able to decrypt the message using the private key and view the data within it. This provides a great way to keep your private data encrypted, but make sure that you protect the private key at all cost! If that becomes compromised, then anyone who has access to the private key now has access to your encrypted data.
About the Author
Boe Prox is a Microsoft MVP in Windows PowerShell and a Senior Windows System Administrator. He has worked in the IT field since 2003, and he supports a variety of different platforms. He is a contributing author in PowerShell Deep Dives with chapters about WSUS and TCP communication. He is a moderator on the Hey, Scripting Guy! forum, and he has been a judge for the Scripting Games. He has presented talks on the topics of WSUS and PowerShell as well as runspaces to PowerShell user groups. He is an Honorary Scripting Guy, and he has submitted a number of posts as a to Microsoft's Hey, Scripting Guy! He also has a number of open source projects available on Codeplex and GitHub. His personal blog is at http://learn-powershell.net.