PowerShell Pipeline
Building a UI using WPF and PowerShell, Part 2
In the previous article, I walked through the basics of using Visual Studio to easily create a UI using some drag-and-drop controls that set up the front end of the UI. From there, we took the XAML code that was automatically generated from the UI and plugged that into the PowerShell ISE under a here string and made the UI display when running some commands. While that is great, it was only the beginning of our adventure into making a useful tool using PowerShell and WPF. Our next step is to make use of Events and Methods for some specific WPF so we can make this into a functional tool that can be given to others to use.
Before we begin, let's have a quick intro to both Methods and Events. A method is specific code that performs an action when called. Methods can also take parameters which are used in the execution of the code. Think of them like a PowerShell function where you have a set of code that runs whenever you type in the function name.
An event is a notification from the object based on a specific circumstance, such as a button being clicked. The fired event sends the notification to an event handler, which contains a set of code that performs an action. So when a button is clicked, the handler will do something like closing the window or performing a scan against a system depending on what button what pushed.
Now we need to look at what possible events that we have on our button controls. Hint: it is a lot! We can pipe our WPF control into Get-Member and specify the type of Event to get a better look at the events.
To make sure that we are looking at the same code, here is the code from the last article that will be run to initially get our variables to the WPF controls.
[xml]$XAML  = @"

  <Window xmlns="http://schemas.microsoft.com/winfx/2006/xaml/presentation"

  xmlns:x="http://schemas.microsoft.com/winfx/2006/xaml"

  xmlns:d="http://schemas.microsoft.com/expression/blend/2008"

  xmlns:mc="http://schemas.openxmlformats.org/markup-compatibility/2006"

  xmlns:local="clr-namespace:MyFirstWPF"

  Title="PowerShell Computer Utility" Height="350"  Width="525">

  <Grid>

  <GroupBox  x:Name="Actions" Header="Actions"  HorizontalAlignment="Left" Height="299"  VerticalAlignment="Top" Width="77"  Margin="0,11,0,0">

  <StackPanel>

  <Button  x:Name="Services_btn" Content="Services"/>

  <Label  />

  <Button  x:Name="Processes_btn" Content="Processes"/>

  <Label  />

  <Button  x:Name="Drives_btn" Content="Drives"/>

  </StackPanel>

  </GroupBox>

  <GroupBox  x:Name="Computername" Header="Computername"  HorizontalAlignment="Left" Margin="92,11,0,0"  VerticalAlignment="Top" Height="45" Width="415">

  <TextBox  x:Name="InputBox_txtbx" TextWrapping="Wrap"/>

  </GroupBox>

  <GroupBox  x:Name="Results" Header="Results"  HorizontalAlignment="Left" Margin="92,61,0,0"  VerticalAlignment="Top" Height="248" Width="415">

  <TextBox  x:Name="Output_txtbx" IsReadOnly="True"  HorizontalScrollBarVisibility="Auto"  VerticalScrollBarVisibility="Auto" />

  </GroupBox>
    </Grid>

  </Window>

"@
$reader=(New-Object System.Xml.XmlNodeReader  $xaml)

  $Window=[Windows.Markup.XamlReader]::Load(  $reader )
#Connect to Controls

  $xaml.SelectNodes("//*[@*[contains(translate(name(.),'n','N'),'Name')]]")  | ForEach {

  New-Variable  -Name $_.Name -Value $Window.FindName($_.Name) -Force

  }
$Null = $Window.ShowDialog()
One thing to note is what I name these controls (look at the x:Name property). I make sure to add the type of control to the name for easier understanding of what each variable controls. So now that we have that out of the way and have ran the code, let's take a look at all of those events under a button!
$Services_btn | Get-Member -Type Event |

  Format-Wide -Column  4 -Property Name
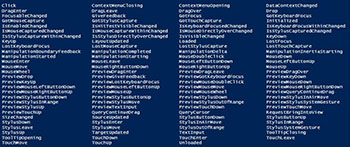 [Click on image for larger view.] Figure 1. A list of button events.
I used Format-Wide so I could create multiple columns to better display the data rather than a single column that could span multiple pages. As you can see, there are 111 events for this button! That is a lot of events and fortunately for us, we only need a single event to accomplish what we want when an action being performed on a button press. Speaking of that, the event that we are looking for is the Click event. This will fire each and every time you press the button on that particular button.
What isn't clear here is exactly how we create the event handler for the Click event. It isn't quite as simple as doing $Services_btn.Click = {} as that will just throw an error your way. The trick to adding the handler is to use .Add_Click({}) method and add your code to be run on the button click.
The end result of our code for handling the Click event on the Services button looks like this:
#region Events

  $Services_btn.Add_Click({

  If (-NOT ([string]::IsNullOrEmpty($InputBox_txtbx.Text)))  {

  Write-Verbose  "Gathering services from $Computername"  -Verbose

  $Computername  = $InputBox_txtbx.Text

  Try  {

  $Services  = Get-Service  -ComputerName $Computername

  $Output_txtbx.Text = ($Services | Out-String)

  }

  Catch  {

  Write-Warning  $_

  }

  }

  })

#endregion Events
Just because the code is running the background when the button is clicked doesn't mean that we ease up on the error handling and data validation. A Try/Catch should always exist in your code to handle the errors that come along. I also make sure that there is actually data in the input box by checking to see that there is not an empty string or null data using [string]::IsNullOrEmpty() method. When we do have a useful computername supplied, we will then query for the services and display them in the output box. Note how I use the Text property in both the input and output text boxes to gather and display the data.
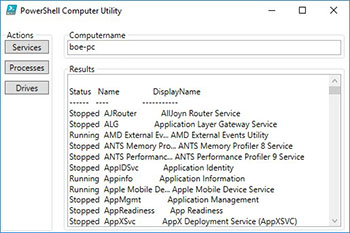 [Click on image for larger view.] Figure 2. Viewing services on a system.
We can now add the code to handle the Processes and Drives buttons and make sure that things look fine.
$Processes_btn.Add_Click({

  If (-NOT ([string]::IsNullOrEmpty($InputBox_txtbx.Text)))  {

  Write-Verbose  "Gathering processes from $Computername"  -Verbose

  $Computername  = $InputBox_txtbx.Text

  Try  {

  $Processes  = Get-Process  -ComputerName $Computername

  $Output_txtbx.Text = ($Processes |  Out-String)

  }

  Catch  {

  Write-Warning  $_

  }

  }

})
$Drives_btn.Add_Click({

  If (-NOT ([string]::IsNullOrEmpty($InputBox_txtbx.Text)))  {

  Write-Verbose  "Gathering drives from $Computername"  -Verbose

  $Computername  = $InputBox_txtbx.Text

  Try  {

  $Drives  = Get-WMIObject  -Class Win32_LogicalDisk  -ComputerName $Computername

  $Output_txtbx.Text = ($Drives | Out-String)

  }

  Catch  {

  Write-Warning  $_

  }

  }

})
Perfect! Let's give these a quick run to make sure that we get the desired results.
First we will test out the Processes button:
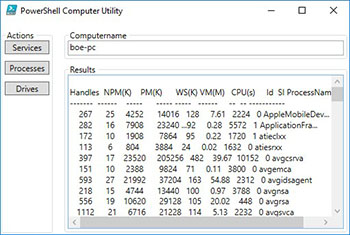 [Click on image for larger view.] Figure 3. Viewing processes on a system
Then we can check out the Drives button:
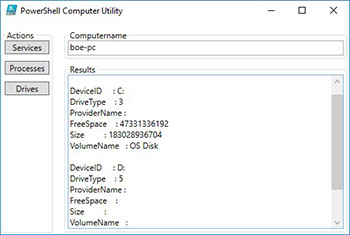 [Click on image for larger view.] Figure 4. Viewing drive space.
Great! We now have a tool to check out a couple of key areas on a local or remote system and can present this to others that might need this but are not so willing to take to the PowerShell console just yet.
The full code for this is here:
[xml]$XAML  = @"

  <Window  xmlns="http://schemas.microsoft.com/winfx/2006/xaml/presentation"

  xmlns:x="http://schemas.microsoft.com/winfx/2006/xaml"

  xmlns:d="http://schemas.microsoft.com/expression/blend/2008"

  xmlns:mc="http://schemas.openxmlformats.org/markup-compatibility/2006"

  xmlns:local="clr-namespace:MyFirstWPF"

  Title="PowerShell Computer Utility" Height="350"  Width="525">

  <Grid>

  <GroupBox  x:Name="Actions" Header="Actions"  HorizontalAlignment="Left" Height="299"  VerticalAlignment="Top" Width="77"  Margin="0,11,0,0">

  <StackPanel>

  <Button  x:Name="Services_btn" Content="Services"/>

  <Label  />

  <Button  x:Name="Processes_btn" Content="Processes"/>

  <Label  />

  <Button  x:Name="Drives_btn" Content="Drives"/>

  </StackPanel>

  </GroupBox>

  <GroupBox  x:Name="Computername" Header="Computername"  HorizontalAlignment="Left" Margin="92,11,0,0" VerticalAlignment="Top"  Height="45" Width="415">

  <TextBox  x:Name="InputBox_txtbx" TextWrapping="Wrap"/>

  </GroupBox>

  <GroupBox  x:Name="Results" Header="Results"  HorizontalAlignment="Left" Margin="92,61,0,0"  VerticalAlignment="Top" Height="248"  Width="415">

  <TextBox  x:Name="Output_txtbx" IsReadOnly="True"  HorizontalScrollBarVisibility="Auto"  VerticalScrollBarVisibility="Auto" />

  </GroupBox>
    </Grid>

  </Window>

"@
$reader=(New-Object System.Xml.XmlNodeReader  $xaml)

  $Window=[Windows.Markup.XamlReader]::Load(  $reader )
#Connect to Controls

  $xaml.SelectNodes("//*[@*[contains(translate(name(.),'n','N'),'Name')]]")  | ForEach {

  New-Variable  -Name $_.Name -Value $Window.FindName($_.Name) -Force

  }
#region Events

  $Processes_btn.Add_Click({

  If (-NOT ([string]::IsNullOrEmpty($InputBox_txtbx.Text)))  {

  Write-Verbose  "Gathering processes from $Computername"  -Verbose

  $Computername  = $InputBox_txtbx.Text

  Try  {

  $Processes  = Get-Process  -ComputerName $Computername

  $Output_txtbx.Text = ($Processes |  Out-String)

  }

  Catch  {

  Write-Warning  $_

  }

  }

  })
$Drives_btn.Add_Click({

  If (-NOT ([string]::IsNullOrEmpty($InputBox_txtbx.Text)))  {

  Write-Verbose  "Gathering drives from $Computername"  -Verbose

  $Computername  = $InputBox_txtbx.Text

  Try  {

  $Drives  = Get-WMIObject  -Class Win32_LogicalDisk  -ComputerName $Computername

  $Output_txtbx.Text = ($Drives | Out-String)

  }

  Catch  {

  Write-Warning  $_

  }

  }

  })
$Services_btn.Add_Click({

  If (-NOT ([string]::IsNullOrEmpty($InputBox_txtbx.Text)))  {

  Write-Verbose  "Gathering services from $Computername"  -Verbose

  $Computername  = $InputBox_txtbx.Text

  Try  {

  $Services  = Get-Service  -ComputerName $Computername

  $Output_txtbx.Text = ($Services | Out-String)

  }

  Catch  {

  Write-Warning  $_

  }

  }

  })

  #endregion Events
$Null = $Window.ShowDialog()
I am not a fan of displaying text in an output text box like here. But it is the simplest way of getting started with creating a UI without much work or knowledge. I couldn't resist making some adjustments such as replacing the TextBox output control with a DataGrid that can auto-generate columns based on the objects that are applied to its ItemsSource property. Another benefit of this is that you can alternate the row color of the grid and provide a more user friendly view of the data such as what you see below:
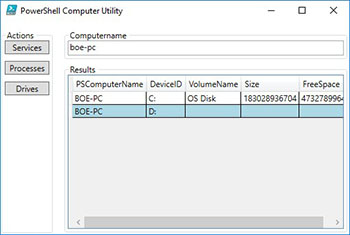 [Click on image for larger view.] Figure 5. Updated display using a DataGrid.
The full code for this can be found below. Now you can go forward and create some great tools for folks in your shop or other shops that can make troubleshooting a breeze!
[xml]$XAML  = @"

  <Window  xmlns="http://schemas.microsoft.com/winfx/2006/xaml/presentation"

  xmlns:x="http://schemas.microsoft.com/winfx/2006/xaml"

  xmlns:d="http://schemas.microsoft.com/expression/blend/2008"

  xmlns:mc="http://schemas.openxmlformats.org/markup-compatibility/2006"

  xmlns:local="clr-namespace:MyFirstWPF"

  Title="PowerShell Computer Utility" Height="350"  Width="525">

  <Grid>

  <GroupBox  x:Name="Actions" Header="Actions"  HorizontalAlignment="Left" Height="299"  VerticalAlignment="Top" Width="77" Margin="0,11,0,0">

  <StackPanel>

  <Button  x:Name="Services_btn" Content="Services"/>

  <Label  />

  <Button  x:Name="Processes_btn" Content="Processes"/>

  <Label  />

  <Button  x:Name="Drives_btn" Content="Drives"/>

  </StackPanel>

  </GroupBox>

  <GroupBox  x:Name="Computername" Header="Computername"  HorizontalAlignment="Left" Margin="92,11,0,0"  VerticalAlignment="Top" Height="45"  Width="415">

  <TextBox  x:Name="InputBox_txtbx" TextWrapping="Wrap"/>

  </GroupBox>

  <GroupBox  x:Name="Results" Header="Results"  HorizontalAlignment="Left" Margin="92,61,0,0"  VerticalAlignment="Top" Height="248"  Width="415">

  <DataGrid  x:Name="Output_dtgrd" AlternatingRowBackground = 'LightBlue'  AlternationCount='2' CanUserAddRows='False'/>

  </GroupBox>
    </Grid>

  </Window>

"@
$reader=(New-Object System.Xml.XmlNodeReader  $xaml)

  $Window=[Windows.Markup.XamlReader]::Load(  $reader )
#Connect to Controls

  $xaml.SelectNodes("//*[@*[contains(translate(name(.),'n','N'),'Name')]]")  | ForEach {

  New-Variable  -Name $_.Name -Value $Window.FindName($_.Name) -Force

  }
#region Events

  $Processes_btn.Add_Click({

  If (-NOT ([string]::IsNullOrEmpty($InputBox_txtbx.Text)))  {

  Write-Verbose  "Gathering processes from $Computername"  -Verbose

  $Computername  = $InputBox_txtbx.Text

  Try  {

  $Processes  = Get-Process  -ComputerName $Computername

  $Output_dtgrd.ItemsSource =  $Processes

  }

  Catch  {

  Write-Warning  $_

  }

  }

  })
$Drives_btn.Add_Click({

  If (-NOT ([string]::IsNullOrEmpty($InputBox_txtbx.Text)))  {

  Write-Verbose  "Gathering drives from $Computername"  -Verbose

  $Computername  = $InputBox_txtbx.Text

  Try  {

  $Drives  = Get-WMIObject  -Class Win32_LogicalDisk  -ComputerName $Computername  |

  Select-Object  PSComputername,  DeviceID,  VolumeName,  Size,  FreeSpace

  $Output_dtgrd.ItemsSource =  $Drives

  }

  Catch  {

  Write-Warning  $_

  }

  }

  })
$Services_btn.Add_Click({

  If (-NOT ([string]::IsNullOrEmpty($InputBox_txtbx.Text)))  {

  Write-Verbose  "Gathering services from $Computername"  -Verbose

  $Computername  = $InputBox_txtbx.Text

  Try  {

  $Services  = Get-Service  -ComputerName $Computername

  $Output_dtgrd.ItemsSource =  $Services

  }

  Catch  {

  Write-Warning  $_

  }

  }

  })

  #endregion Events
$Null = $Window.ShowDialog()
About the Author
Boe Prox is a Microsoft MVP in Windows PowerShell and a Senior Windows System Administrator. He has worked in the IT field since 2003, and he supports a variety of different platforms. He is a contributing author in PowerShell Deep Dives with chapters about WSUS and TCP communication. He is a moderator on the Hey, Scripting Guy! forum, and he has been a judge for the Scripting Games. He has presented talks on the topics of WSUS and PowerShell as well as runspaces to PowerShell user groups. He is an Honorary Scripting Guy, and he has submitted a number of posts as a to Microsoft's Hey, Scripting Guy! He also has a number of open source projects available on Codeplex and GitHub. His personal blog is at http://learn-powershell.net.