PowerShell How-To
Getting Started Testing PowerShell Scripts with Pester
- By Adam Bertram
- 05/11/2016
When you write a PowerShell script how do you truly know it worked? Do you define it to be successful when it doesn't throw an error? If so, what about those times when you might have accidentally silenced the non-terminating errors with $ErrorActionPreferennces or used -ErrorAction Ignore? What if an if/then statement somewhere in your code didn't match a condition you expected it to and completely skipped over a part of the code? Defining success by a simple error is not a good way of validating your scripts. You need to write code that is separate from your script that verifies the functionality rather than just assuming. The only way to do that is through testing, and when using PowerShell, that testing suite is Pester.
Pester is a unit testing framework built with PowerShell in mind. It was created because, although PowerShell is a powerful scripting language, no one had yet considered it a true software development language. Software developers had been writing and executing tests against their code for decades, but no one considered PowerShell scripts to be "software." Nowadays, people are doing extraordinary things with PowerShell and the need to validate PowerShell code is critical. With Pester, PowerShell developers can quickly build tests just like the "big boy" software developers do.
If you're just a system administrator that's been writing PowerShell scripts for a while, the concept of testing may be foreign to you. If so, this article should shed some light on the idea of software testing and give you enough information to get started writing your own tests.
If you're on Windows 10, you're in luck. Pester comes installed by default. If you're on any other Windows operating system, you'll need to download the module. There are a couple ways to do that. I recommend downloading it from the PowerShell Gallery using PowerShellGet. By using the Find-Module cmdlet, you can easily find Pester.
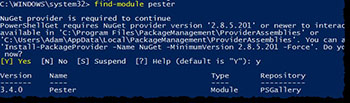 [Click on image for larger view.] Figure 1.
To install simply pipe that result to Install-Module.
Find-Module –Name 'Pester' | Install-Module
You're now ready to start writing tests and executing them. The cmdlet that you'll become the most accustomed to is Invoke-Pester. This is the cmdlet that kicks off one or more tests that you create. But first, you need to write your first test to execute.
To demonstrate this, let's say I have a function called Find-Waldo. This function takes a parameter input as a path to a file and then searches that file for a string "waldo." If found, it returns the file path, the line number and the line that waldo was found on.
 function Find-Waldo

  {

  [CmdletBinding()]

  param

  (

  [string]$FilePath

  )


  Select-String  -Path $FilePath -Pattern 'waldo'

  }
How would we go about testing this? When you first start with testing, you'll inevitably come to the question of what to test, not necessarily how to test. For the what question, you need to think about your script or function regarding three different phases; input, processing and output. What kind of information will be going in? How many different ways can that happen? What will it supposed to do to that input once it's in the function and finally what are all of the different kinds of iterations that could possibly come out of the function? These are the necessary questions to ask yourself before writing your first test.
I always check expected object types in both the input and output phases. The input phase is simple in this scenario. We can see that $FilePath needs to be a string. However, the output object type isn't quite as straightforward. I need to see what Select-String will output when waldo is found and when it's not. I'll create a test file with waldo inside and check the object type it outputs.
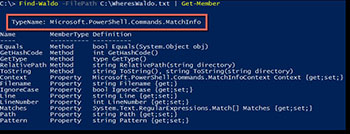 [Click on image for larger view.] Figure 2.
You can see that it outputs an object type of Microsoft.PowerShell.Commands.MatchInfo. Let's build a test for this.
It's best practice to include your tests with your code. Perhaps I'm dot sourcing my Find-Waldo function inside of a script called Waldo.ps1 that's located in C:\WheresWaldo. I should create a test file in that same folder. To do that, I can take a shortcut and use the New-Fixture cmdlet. This is a built-in cmdlet that builds a template for you.
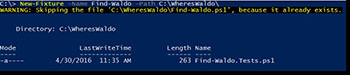 [Click on image for larger view.] Figure 3.
This will create a test script that looks like this:
 [Click on image for larger view.] Figure 4.
At this point, the only thing I have to do is change the name of the It block and the code inside to test for both inputs into and outputs from Find-Waldo. At this point since we're not testing what's actually inside of the function, we'll need to skip over that. Instead of simply commenting it out, we can use a mock. A mock is a way to override functions in your code to test out various scenarios. In this case, since I don't want Select-String to actually run, I'll just mock it out to output $null essentially neutering it. My it block now looks something like this:
    it  'only allows a string to be passed to the FilePath parameter_when called' {

  mock 'Select-String'  {

  return $null

  }
        { Find-Waldo  -FilePath [pscustomobject]@{} } | should not throw

  }
Since Find-Waldo's FilePath parameter is a string, I know that if I try to pass another kind of object to it, it will throw an exception. Here I'm using a should assertion by enclosing the call to Find-Module in braces and asserting that it should not throw an exception.
Now that I have a simple test built, I can use Invoke-Pester to run it.
 [Click on image for larger view.] Figure 5.
You can see that I didn't have to specify the test file individually. This is because Invoke-Pester will automatically look for all files ending in Tests.ps1 and execute them.
You can see just how powerful Pester can be here. We've just scratched the surface. I encourage you to look deeper into Pester and see what other kinds of useful tests you can build for your PowerShell code!
About the Author
Adam Bertram is a 20-year veteran of IT. He's an automation engineer, blogger, consultant, freelance writer, Pluralsight course author and content marketing advisor to multiple technology companies. Adam also founded the popular TechSnips e-learning platform. He mainly focuses on DevOps, system management and automation technologies, as well as various cloud platforms mostly in the Microsoft space. He is a Microsoft Cloud and Datacenter Management MVP who absorbs knowledge from the IT field and explains it in an easy-to-understand fashion. Catch up on Adam's articles at adamtheautomator.com, connect on LinkedIn or follow him on Twitter at @adbertram or the TechSnips Twitter account @techsnips_io.