Prof. Powershell
The PowerShell Blacksmith Part 4: Fine-Tuning Functions
Part 4 takes the function created last time and adds a validation attribute.
- By Jeffery Hicks
- 10/15/2013
In the last article we finished crafting a fully functioning PowerShell tool. We got the job done but if we want to be noticed as PowerShell craftsmen, we need to take the next step. What I'm going to suggest might seem as decorative or showy. But I think these are items that add value to your tool.
The function, as it is now, has a single parameter:
Param (
[Parameter(ValueFromPipeline=$True)]
$InputObject
)
We know it is supposed to be a numeric value. But what if someone tries to use a non-numeric value? In this function it would error out pretty quickly. But the recommended practice is to cast the parameter to the correct type. For example, if the tool you were building had a parameter for a computer name, you should cast it as a [string].
Param (
[string]$Computername
)
In the tool I've built the inputobject needs to be a number. Unfortunately there isn't a type that means "any number." There are types like [int] and [double] but those might affect the format of any incoming data and I know I need to accommodate numbers like 10, 9.2345, -45 and .876. So here's what I'm going to do, and it helps illustrate another "jewel": validation.
Param (
[Parameter(Mandatory=$True,ValueFromPipeline=$True)]
[ValidateRange([int64]::MinValue,[int64]::MaxValue)]
[psobject]$InputObject
)
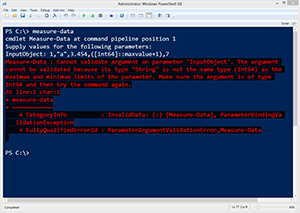
I've added a validation attribute that describes a range of numbers. If the parameter value can be interpreted as a number between those values, it will be accepted. Otherwise PowerShell will throw an exception. I've also gone ahead and made the parameter mandatory so that if someone tries to run the command and forget to specify a parameter value, PowerShell will prompt them. Figure 1 shows the result of these changes.
 [Click on image for larger view.] Figure 1.
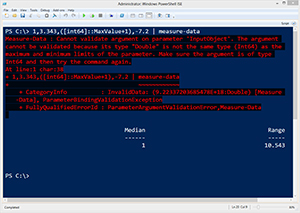
It is important to test for failures to prove your validation works:
 [Click on image for larger view.] Figure 2.
If you want to learn more about these validation techniques, take a look at the ScriptingHelp module I posted last year on my blog.
Next, I'm a big fan of "hope for the best, plan for the worst." To that end, I need to add some troubleshooting or debugging aids. These are items that you really should add from the beginning of your process but I didn't want to make the process any more complicated. My preferred technique is to use Write-Verbose throughout the function to provide feedback about what the script is doing, the value of critical variables or anything else that can help me narrow down the location should a problem arise. Here's what I did with the tool:
Function Measure-Data {
[cmdletbinding()]
Param (
[Parameter(Mandatory=$True,ValueFromPipeline=$True)]
[ValidateRange([int64]::MinValue,[int64]::MaxValue)]
[psobject]$InputObject
)
Begin {
#define an array to hold incoming data
Write-Verbose "Defining data array"
$Data=@()
} #close Begin
Process {
#add each incoming value to the $data array
Write-Verbose "Adding $inputobject"
$Data+=$InputObject
} #close process
End {
#take incoming data and sort it
Write-Verbose "Sorting data"
$sorted = $data | Sort-Object
#count how many elements in the array
$count = $data.Count
Write-Verbose "Counted $count elements"
#region calculate median
if ($sorted.count%2) {
<#
if the number of elements is odd, add one to the count
and divide by to get middle number. But arrays start
counting at 0 so subtract one
#>
Write-Verbose "processing odd number"
[int]$i = (($sorted.count+1)/2-1)
#get the corresponding element from the sorted array
$median = $sorted[$i]
}
else {
<#
if number of elements is even, find the average
of the two middle numbers
#>
Write-Verbose "processing even number"
$i = $sorted.count/2
#get the lower number
$x = $sorted[$i-1]
#get the upper number
$y = $sorted[-$i]
#average the two numbers to calculate the median
$median = ($x+$y)/2
} #else even
#endregion
#region calculate range
Write-Verbose "Calculating the range"
$range = $sorted[-1] - $sorted[0]
#endregion
#region write result
Write-Verbose "Median = $median"
Write-Verbose "Range = $range"
#define a hash table for the custom object
$hash = @{Median=$median;Range=$Range}
#write result object to pipeline
Write-Verbose "Writing result to the pipeline"
New-Object -TypeName PSobject -Property $hash
#endregion
} #close end
} #close measure-data
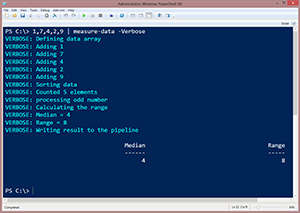
The Write-Verbose lines won't do anything unless you run the command with –Verbose. That's why I include the [cmdletbinding()] attribute. You can see the result in Figure 3.
 [Click on image for larger view.] Figure 3.
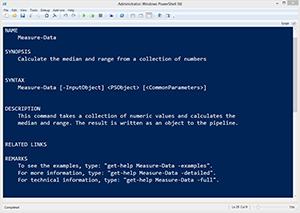
Finally, the last, and perhaps most important jewel to embed is help documentation. This takes very little time to add. At a minimum I recommend defining the Synopsis, Description and one example. The comment help should go after the function opening.
Function Measure-Date {
<#
.Synopsis
Calculate the median and range from a collection of numbers
.Description
This command takes a collection of numeric values and calculates the
median and range. The result is written as an object to the pipeline.
.Example
PS C:\> 1,4,7,2 | measure-data
Median Range
------ -----
3 6
.Example
PS C:\> dir c:\scripts\*.ps1 | select -expand Length | measure-data
Median Range
------ -----
1843 178435
#>
[cmdletbinding()]
…
As a side note, you don't have to include the prompt in your example. PowerShell will insert it, but it will look like C:\PS> which to me looks like a command prompt at the PS directory. So I prefer to explicitly use a more PowerShell-looking prompt. Now when someone, maybe you, asks for help on how to use your command it will look just like any other PowerShell command.
 [Click on image for larger view.] Figure 4.
Next time we'll explore ways of accessorizing our new tool. In the meantime, you can get a text file of the current project here.
About the Author
Jeffery Hicks is an IT veteran with over 25 years of experience, much of it spent as an IT infrastructure consultant specializing in Microsoft server technologies with an emphasis in automation and efficiency. He is a multi-year recipient of the Microsoft MVP Award in Windows PowerShell. He works today as an independent author, trainer and consultant. Jeff has written for numerous online sites and print publications, is a contributing editor at Petri.com, and a frequent speaker at technology conferences and user groups.