PowerShell How-To
How To Compare the Contents of Two Folders with PowerShell
Make sure two documents are both exact and in sync with this process.
- By Adam Bertram
- 04/14/2016
Let's say you've got a PowerShell script that copies and relevant set of documents from a server to your CEO's desktop. He checks these documents every single day. Religiously. These documents are what makes or breaks your entire company. And you are the one in charge of copying these documents from the server to his desktop. Will you leave anything to chance? Probably not. Among other things, you're going to do everything you can to ensure the documents on the server are exactly the same as what's on his desktop.
Regardless of the fact this scenario will most likely never happen to you (although I've heard of crazier situations), the requirement does still pop up from time to time. You have a requirement where you need to ensure that two folders containing a set of files are in sync. This can be done a couple different ways. Each depends on just how certain you want to be. In this article, I'll start with the easiest yet least precise method to comparing those CEO documents I described earlier.
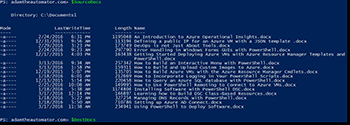
To make a proper comparison, regardless of the method, we need to figure out the file names in each of the folders. An easy way to do this is to only use the Get-ChildItem cmdlet on each folder.
$SourceDocs = Get-ChildItem –Path C:\Documents1

  $DestDocs = Get-ChildItem –Path C:\Documents2
Once I do this, you can see that $SourceDocs contains all of the files I'd like copied to C:\Documents2 but C:\Documents2 has no files in it at all.
 [Click on image for larger view.] Figure 1.
I'll now copy the documents to get them in sync. Well, I think they're in sync. Let's be entirely sure.
One way I can do this is just ensuring the files in each folder are all Word documents and have the same number of them in each folder.
 [Click on image for larger view.] Figure 2.
That's not too accurate, though. The file names could be different and could be various sizes. Let's get more specific.
I could also find the total size of each folder because what are the chances of having each folder having files adding up to the exact same size?
 [Click on image for larger view.] Figure 3.
This is less likely but still might not be the exact same files. I'll then compare just the file names.
 [Click on image for larger view.] Figure 4.
In the above example, I've removed one file to show you how Compare-Object works. This indicates that the document is in the source but not in the destination. Even though this might be tempting to leave at this, what if the documents remained the same but the contents were modified?
You can see there are various ways to do this but each has its downfalls. The only true way to compare these folders is to check the file hash on each one and compare with each other. This makes 100% sure the documents are exactly the same in both folders.
PowerShell v4 introduced a handy cmdlet called Get-FileHash. By using this cmdlet, I can calculate a unique string of numbers and letters uniquely representing each file. One I'm able to calculate the hash for each file in each folder I can then compare those strings to get an accurate representation of the differences (if any).
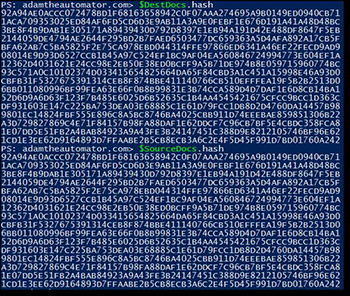
I've picked one of the documents here and calculated it's hash using Get-FileHash. You can see the hash represented by the Hash property. This is the value I need to generate on each file in each folder to make the comparison with.
 [Click on image for larger view.] Figure 5.
I've gone ahead and put that document back in C:\Documents2 to make them in sync again (or so I think). I'll now calculate the hash of each file in each folder.
$SourceDocs = Get-ChildItem –Path C:\Documents1 | foreach  {Get-FileHash –Path $_.FullName}

  $DestDocs = Get-ChildItem –Path C:\Documents2 | foreach  {Get-FileHash –Path $_.FullName}
You can now see we've captured the hash of each file in each folder.
 [Click on image for larger view.] Figure 6.
Now that we have the hash for each file, it's just a matter of comparing them with Compare-Object.
If all files are exactly the same, you will get no output from this command:
Compare-Object -ReferenceObject $SourceDocs.Hash -DifferenceObject $DestDocs.Hash
Let's change something in one of the documents. I'm just going to add a single space to one of them as you can see below.
 Figure 7.
I'll run the compare again and you can see that the hashes are different now.
 [Click on image for larger view.] Figure 8.
But I need to see the file names! No problem. By using the entire object rather than just the hash string and specifying the Hash property with the –Property parameter on Compare-Object, I can get the files that represent each hash.
(Compare-Object -ReferenceObject $SourceDocs -DifferenceObject $DestDocs -Property hash -PassThru).Path
 [Click on image for larger view.] Figure 9.
You can now see the document that has changed.
As you've seen, there are numerous ways to compare the contents of two folders. The surest way is through file hashing but, if you attempt to do this with folders with tens of thousands of files or more, you'll see that it's by far the slowest. Use whatever method works for you in your current situation.
About the Author
Adam Bertram is a 20-year veteran of IT. He's an automation engineer, blogger, consultant, freelance writer, Pluralsight course author and content marketing advisor to multiple technology companies. Adam also founded the popular TechSnips e-learning platform. He mainly focuses on DevOps, system management and automation technologies, as well as various cloud platforms mostly in the Microsoft space. He is a Microsoft Cloud and Datacenter Management MVP who absorbs knowledge from the IT field and explains it in an easy-to-understand fashion. Catch up on Adam's articles at adamtheautomator.com, connect on LinkedIn or follow him on Twitter at @adbertram or the TechSnips Twitter account @techsnips_io.