PowerShell How-To
Connecting to an Azure SQL Database with PowerShell
Move a whole database into the cloud quickly by following this walkthrough.
- By Adam Bertram
- 04/21/2016
One way that organizations are storing data in the cloud is by moving their databases to the cloud. What once meant building an entire physical server, patching it, installing software like Microsoft SQL Server, tuning it to meet performance SLAs and managing it now is as simple as a couple of keystrokes or mouse clicks to get access to a high-performance SQL database.
When connecting to SQL servers in the cloud, sometimes typical GUI access will not cut it. This is when you need to focus on automation tools like Windows PowerShell.
To query any SQL database from PowerShell, you need to have the SQLPS module installed along with a few supporting packages. I am going to be focusing on the SQL Server 2012 packages in this article. These will allow you to query your Azure SQL database. You will need:
Once you've got all three SQL components installed, it is now time to get the Azure PowerShell prerequisite installed; the Azure PowerShell module.
Once you have that installed, we now have the majority of the functionality available to query Azure SQL databases. It is now time to connect to our Azure subscription and associate our account in the current PowerShell session. To do this, we'll use the Add-AzureAccount cmdlet. Just calling this by itself brings up a graphical box that prompts you to input your Azure e-mail and password.
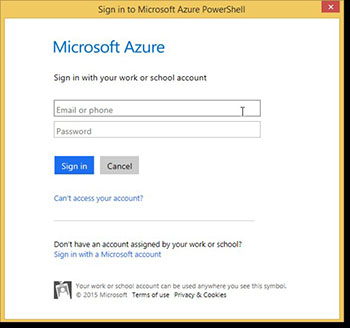 [Click on image for larger view.] Figure 1.Azure Authentication Prompt.
Once successful, you should then receive output that displays your user ID, subscription ID and tenant ID. If you see this, you've authenticated successfully!
 [Click on image for larger view.] Figure 2. Successful Azure PowerShell Connection Output.
Although this next step might have been set for other reasons, you must have a server firewall rule setup to allow incoming SQL connections from your client to your Azure SQL database. Again, you can do this via the Azure portal, but a couple of lines in PowerShell will do it just as easily.
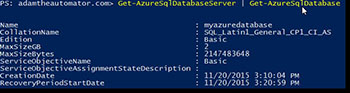
To do it via PowerShell, you'll need your Azure SQL database server name. To get this, you can use the Get-AzureSqlDatabaseServer cmdlet. You can see here that I have a single server called adamazuresql that I will need to use.
Get-AzureSqlDatabaseServer
 [Click on image for larger view.] Figure 3. Your SQL Database Servers.
Next, you'll need to create the rule to allow one or a block of IP addresses. If you'd like just to let the public IP address you are coming from (if the computer you're working on has a NATed IP address), you can use Invoke-WebRequest again to query an external web service and parse out the IP address.
$ipAddress = (Invoke-WebRequest 'http://myexternalip.com/raw').Content -replace "`n"
Next, we'll create the firewall rule using the New-AzureSqlDatabaseServerFirewallRule cmdlet. This is where you'll need to use the server name you found earlier, specify a rule name and specify the start and end IP address. In our case, they will be the same since we are just allowing a single IP address.
New-AzureSqlDatabaseServerFirewallRule -ServerName $serverName -RuleName 'ClientRule' -StartIpAddress $ipAddress -EndIpAddress $ipAddress
At this point, we have everything in place to begin querying data from our Azure SQL Server database. You'll now need your database name, the Azure SQL Server instance name, the username and password with access to the database and the table name you'd like to query.
To find the database name you can pipe the output of Get-AzureSqlDatabasServer directly to Get-AzureSqlDatabase. You can see here that I'll be using a database name of myazuredatabase.
 [Click on image for larger view.] Figure 4. How to Find Azure SQL Databases
You can find all of the other information required on the Azure portal. Once you have all of the criteria needed it is simply a matter of passing all of these parameters to the Invoke-SqlCmd cmdlet. This cmdlet comes from the SQLPS module we installed earlier.
$params = @{

  'Database' = 'myazuredatabase'

  'ServerInstance' =  'yoursqinstance.database.windows.net'

  'Username' = 'adam'

  'Password' = 'mysecretpassword'

  'OutputSqlErrors' = $true

  'Query' = 'SELECT * FROM Users'

  }

  Invoke-Sqlcmd  @params
You can see from the above example that I am passing the T-SQL query "SELECT * FROM Users" which is retrieving all rows from the Users table in the database myazuredatabase which is located on the yoursqlinstance.database.windows.net server instance using my pre-created username and password. This gives me an output that looks like the below screenshot.
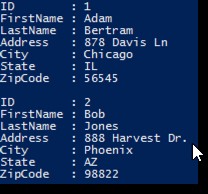 Figure 5. Example Output from Invoke-SqlCmd.
By using a single tool like PowerShell, you can access your data wherever it is stored. It does not matter if it is in the cloud in an Azure SQL database or in an on-premises MS-SQL server, MySQL or even inside an Oracle or Postgres database. Chances are there's a PowerShell module that allows you to hook into that data.
About the Author
Adam Bertram is a 20-year veteran of IT. He's an automation engineer, blogger, consultant, freelance writer, Pluralsight course author and content marketing advisor to multiple technology companies. Adam also founded the popular TechSnips e-learning platform. He mainly focuses on DevOps, system management and automation technologies, as well as various cloud platforms mostly in the Microsoft space. He is a Microsoft Cloud and Datacenter Management MVP who absorbs knowledge from the IT field and explains it in an easy-to-understand fashion. Catch up on Adam's articles at adamtheautomator.com, connect on LinkedIn or follow him on Twitter at @adbertram or the TechSnips Twitter account @techsnips_io.