PowerShell How-To
How To Create a Simple Pester Test Report in PowerShell
While Pester doesn't generate it's own reports, it does provide data that can be easily formatted.
- By Adam Bertram
- 12/01/2016
Pester is an easy-to-use testing framework for PowerShell code. It was originally adopted to be a unit testing framework but can also be adapted to perform integration and acceptance testing as well. Mostly, since Pester is written in PowerShell, it can be utilized to test just about anything you can throw at it. Pester, although an excellent command-line tool, lacks in the reporting department. As you begin to write complicated testing scenarios, you'll ultimately come across a situation where you think to yourself, "It'd sure be nice if I could report on my tests and have some kind of Web interface to understand failures better." You're in luck because it can be done!
Since Pester itself does not provide any kind of reporting mechanism, per se and sends all output to the PowerShell console, it does have a handy option to format that output in a couple different ways through providing a parameter to the Invoke-Pester command. To demonstrate this, I've created a couple simple tests for a Web server.
describe 'IIS Website' {

  it 'is  listening on port 80' {

  Test-NetworkPort  -ComputerName MEMBERSRV1 -Port 80 | should be $true

  }
            it 'the  index.htm page is in the webroot' {

  Get-Item  \\MEMBERSRV1\c$\inetpub\wwwroot\index.htm -ErrorAction SilentlyContinue |  should not be $null

  }

  }
Running Invoke-Pester to execute these tests comes back with an output that looks like this:
Invoke-Pester -Path C:\IISWebSite.Tests.ps1
 [Click on image for larger view.] Figure 1.
This has some nice color coding and is generally easy to read but soon falls short when invoking hundreds or thousands of tests. Instead, Pester gives us an option of sending the results to XML in a format that the industry-standard unit-testing framework Nunit can read. Let's now add the OutputFormat and OutputFile parameters to send Pester's test results to an nUnit-compatible XML file.
Invoke-Pester -Path C:\IISWebSite.Tests.ps1 -OutputFormat NUnitXml -OutputFile C:\ -Quiet
Notice now we get no output at all. Not necessarily. It was just saved to an XML file in a file called C:\IISWebsite.xml (the same name as the test file).
 [Click on image for larger view.] Figure 2.
Notice that this XML file has all of the same attributes. But what's the advantage of sending it to an XML file? The reason is because this is now in a format that graphical tools understand. Graphical reporting tools like ReportUnit can't understand PowerShell text output but do understand Nunit-formatted XML!
Let's now setup a tool like ReportUnit that can take this output and provide an intuitive reporting interface to it. We'll first need to download the main reportunit tool. You can do this through relevantcodes.com or through NuGet. Unfortunately, at the time of writing, the download link was broken. I was forced to download the NuGet package, rename to .zip, extract and get to the reportunit.exe tool that way.
After you've downloaded ReportUnit, you'll simply need to pass the XML output that Pester provided and the folder where you'd like to place the resulting HTML file. I've moved the XML file into the C:\Tests file and creating the corresponding HTML file in C:\Results.
C:\reportunit.1.5.0-beta1\tools\ReportUnit.exe C:\Tests\ C:\Results\
 [Click on image for larger view.] Figure 3.
I'll now move the IISWebsite.html file to a web server and view our results.
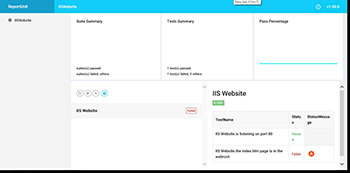 [Click on image for larger view.] Figure 4.
You can now see the difference in standard Pester output and how it can be displayed in a great-looking Web interface. Imagine putting this solution into an automated build process. This process would allow you to test code and automatically create HTML pages which can then go into a central reporting dashboard service! Very cool.
About the Author
Adam Bertram is a 20-year veteran of IT. He's an automation engineer, blogger, consultant, freelance writer, Pluralsight course author and content marketing advisor to multiple technology companies. Adam also founded the popular TechSnips e-learning platform. He mainly focuses on DevOps, system management and automation technologies, as well as various cloud platforms mostly in the Microsoft space. He is a Microsoft Cloud and Datacenter Management MVP who absorbs knowledge from the IT field and explains it in an easy-to-understand fashion. Catch up on Adam's articles at adamtheautomator.com, connect on LinkedIn or follow him on Twitter at @adbertram or the TechSnips Twitter account @techsnips_io.