Windows Advisor
How To Manage Storage Spaces and Storage Pools in Windows Server 2012
Microsoft delivered a completely new way of looking at our disks and storage in Windows Server 2012, with the biggest change in how storage is laid out and provisioned. Here's how to create and manage it all.
Windows Server 2008 R2 used the traditional disk management MMC snap-in to manage the disk configuration, as well as the handy DISKPART command-line tool. It is fair to say that the storage subsystem was not exactly optimized for high speed, resilience or large-scale file server operations. So when the Windows Server team designed the new Windows Server 2012, they took a long hard look at storage.
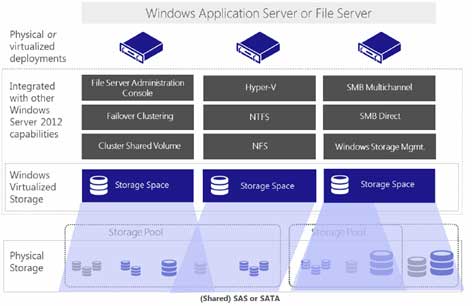
The solution that Microsoft delivered is a completely new way of looking at our disks and storage in Windows Server 2012, with raft of changes in the storage arena. These include SMB 3.0, which opens up a number of exciting new possibilities. The biggest change, though, has been reserved for the layout and provision of the storage itself. The introduction of storage spaces bring with it the ability to provide clustering for high availability and integration with Cluster Shared Volumes for scalable deployments of virtual machines, file shares and other workloads.
Storage Spaces lets you group industry-standard disks into at least one storage pool. You can then create virtual disks from the available capacity. One of the most useful add-ons when using this technology is that you can thin provision a pool and it can grow as needed.
How Microsoft Achieves All This Disk Trickery
The concept of a storage pool and a Storage Space is based on taking a bunch of physical disks and creating a virtual single pool of space. This pool is then used to create volumes for our use. Clever!
 |
(Click image to view larger version.) |
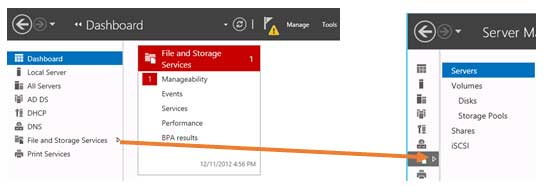
File and storage services is one of the 18 roles within Windows Server 2012 and requires nothing other than a working installation. The server can be a full GUI or the Server Core version. The storage subsystem can be controlled locally, remotely through a GUI or by PowerShell cmdlets:
 |
(Click image to view larger version.) |
Server Manager is the place to manage the role. Clicking File and Storage Services opens up the individual management areas:
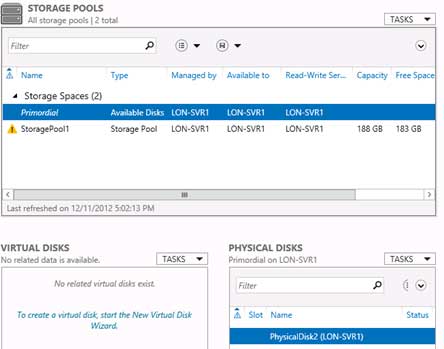
Storage Pools shows the individual storage spaces you have created on the local server or have access to on a remote server. The "primordial" space refers to any physical disks added to the server but not yet added to a storage space. Adding a disk wipes all data from it.
The full pool screen shows details about the storage spaces and the constituent physical disks, as well as any virtual disks already created on it:
 |
(Click image to view larger version.) |
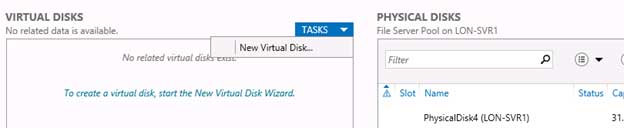
To create a new pool, simply click Tasks then Create New Storage Pool to fire up the wizard:
Choose the physicals disks you want to be part of the pool:
The pool shows up. Note that if you use all physical disks, the primordial space will disappear:
You can remove an individual disk from a pool, but this creates a warning about data loss:
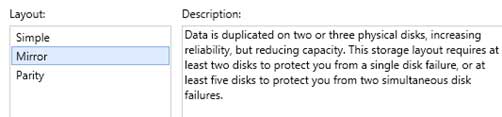
Having created a pool, the next task is to create a virtual disk on which to create our volume. I will create a three-way mirrored disk, although my choices are from simple spanning (or JBOD), Parity (three disks needed) or two- or three-way mirroring (three-way requires at least five disks):
 |
(Click image to view larger version.) |
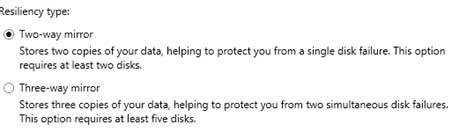
Choose resilience type:
 |
(Click image to view larger version.) |
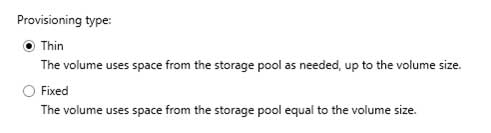
Choose provisioning type:
 |
(Click image to view larger version.) |
Choose a disk size:
Choose two- or three-way mirroring:
 |
(Click image to view larger version.) |
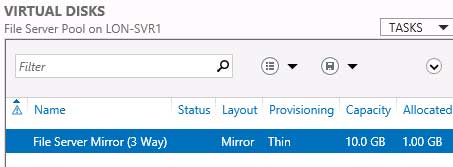
On completion, the wizard creates the mirror:
 |
(Click image to view larger version.) |
Note that although I created a 10GB three-way mirror, only 1GB is allocated at present (thin provisioning). As data is saved, the allocation will increase accordingly:
 |
(Click image to view larger version.) |
The final step is to create a usable volume on this mirror. This could be a mount point or a drive letter. A new wizard is required.
Right-click the new mirrored virtual disk, then select New Volume. Without this, the storage we just created will not
be accessible to the operating system or users:
Choose the correct disk (physical or virtual on which you wish to create a volume -- note all unallocated physical disks will appear here as well as virtual ones):
Choose the volume size, up to the full size of the virtual disk you created:
Decide whether the user is going to see a new drive letter or whether you wish to use this volume as a mount point in an empty NTFS folder on another volume:
Choose the format of the file system. Options include NTFS and the new Resilient File System:
The chosen drive letter now appears in your list of volumes available. Note it is shown as thinly provisioned:
In summary
Microsoft has now given us a tool that has huge implications for our local and centralized storage on servers. Small businesses that cannot stretch to Fibre Channel or iSCSI implementations can now provision scalable, resilient systems for clustering, file servers and application usage. All this can be achieved out of the box, with industry-standard cheap storage hardware.
The Mirror and Parity resilience types are pseudo-RAID and will apparently recover even in a totally unrelated system and will auto-recover on a local server when new storage is added. Despite this, I would still only ever trust my data to hardware implemented RAID and then place that in a storage pool -- some habits die hard.
The Storage Spaces and storage pool feature within Windows Server is a huge leap forward in Windows Server usability.