PowerShell How-To
Writing PowerShell Code for Performance
The cmdlet Measure-Command will test and evaluate your code to make sure it's as optimal as can be.
- By Adam Bertram
- 07/06/2016
As a PowerShell scripter for a long time, I've since graduated from how to write code to get the job done how to write code in the most efficient manner. As you progress in your PowerShell knowledge, you'll soon see what I'm referring to. There comes a point to where you have enough knowledge to where you can do just about anything in PowerShell. You're able to automate all kinds of things by sleuthing through the PowerShell help system and performing a few Google searches. This is searching for how to do something like how to query Active Directory, how to read a CSV file or how to process each item in an array just to get the job done. How efficient and how long that process takes is of minimal concern.
Eventually, your priorities evolve into not simply how to get the job done but how to get the job done in the quickest, most efficient way while following best practices. In this article, I'm going to cover some tips and tricks to make your PowerShell code not only work but work in the quickest way possible.
To truly know how beneficial it is spending time optimizing code you'll first need to learn how to measure the results. After all, just eyeballing results isn't too accurate. We need an easy way to test different iterations. Luckily for us, PowerShell has an easy-to-use cmdlet called Measure-Command. To use Measure-Command, we can just enclose our code snippet inside of a scriptblock and pass that to Measure-Command.
Also, for proper testing you need to start with the exact same baseline. For example, if you're trying to find the fastest way to process a CSV file you wouldn't use different CSV files or even more precisely, you wouldn't even want to store the CSV files in a different location. It's important to remove as much of the environment out of the equation as much as possible. The processing time for the same CSV file placed on an SSD or on a spinning disk hard drive is going to be significantly different. Start with the exact same environmental situation to get an accurate picture of the speed difference.
Now that you have the baseline and know how to measure performance let's dive into a simple example to demonstrate this.
One of the easiest and most useful tricks to speed up your code is knowing the different ways that an array can be iterated through. The most common is using a foreach loop in some manner. PowerShell provides three distinct options.
- Foreach-Object cmdlet
- Foreach statement
- .foreach()
Let's first establish a baseline. I'll do this by creating an array of 10,000 integers.
0..10000
Let's now iterate over each of these integers with Foreach-Object and measure the result with Measure-Command. For more accurate results, I'll take the average of three runs.
$totalTime = 0

  for ($i=0; $i -lt 3;  $i++) {

  $totalTime  += (Measure-Command { 0..10000 | Foreach-Object {  }}).TotalMilliseconds

  }

  $totalTime / 3
 [Click on image for larger view.] Figure 1.
You can see this produced an average time of 104.65 milliseconds.
Let's now do the exact same thing using the foreach statement.
$totalTime = 0

  for ($i=0; $i -lt 3;  $i++) {

  $totalTime  += (Measure-Command { foreach ($x in 0..10000) {  }}).TotalMilliseconds

  }

  $totalTime / 3
 [Click on image for larger view.] Figure 2.
Notice that this is method is over 16x faster yet essentially performing the same result!
Let's now end with the .foreach() method introduced in PowerShell v4.
$totalTime = 0

  for ($i=0; $i -lt 3;  $i++) {

  $totalTime  += (Measure-Command { (0..10000).foreach({   })}).TotalMilliseconds

  }

  $totalTime / 3
 [Click on image for larger view.] Figure 3.
In this instance, the usually faster foreach() method was actually slower than the foreach statement.
The times don't necessarily matter. You're looking for the time difference here. When iterating over a range of integers, it seems the best bet is to use the foreach statement.
To cover one more typical example, let's go over two different ways of adding elements to an array. The most common way is to do this:
$array = @()

  $array += 'newitem'
This works, but this method has to remove the array and build a new one each time an element is added. Instead, notice this method that uses an ArrayList instead.
[System.Collections.ArrayList]$array  = @()

  $null =  $array.Add('newitem')
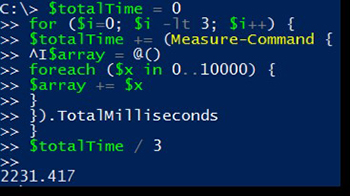
Each method essentially does the same thing. Let's test which one is faster. Again, I'll create a large array of integers and use the foreach statement for both as a baseline and put each method through its paces.
$totalTime = 0

  for ($i=0; $i -lt 3;  $i++) {

  $totalTime  += (Measure-Command {

  $array = @()

  foreach ($x in 0..10000) {

  $array += $x

  }

  }).TotalMilliseconds

  }

  $totalTime / 3
 [Click on image for larger view.] Figure 4.
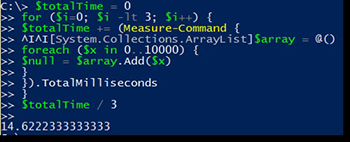
OK, not bad. We got a result of 2231 milliseconds. Now let's try to use the array list and see what the difference is.
$totalTime = 0

  for ($i=0; $i -lt 3;  $i++) {

  $totalTime  += (Measure-Command {

  [System.Collections.ArrayList]$array =  @()

  foreach ($x in 0..10000) {

  $null = $array.Add($x)

  }

  }).TotalMilliseconds

  }

$totalTime / 3
 [Click on image for larger view.] Figure 5.
Wow! That's a 159X improvement! I think I'll start using that approach.
These were just a few typical examples of different ways to perform the same task. When you're coding, be cognizant of the way you're structuring code. Always be on the lookout for more efficient ways to get the same job done.
About the Author
Adam Bertram is a 20-year veteran of IT. He's an automation engineer, blogger, consultant, freelance writer, Pluralsight course author and content marketing advisor to multiple technology companies. Adam also founded the popular TechSnips e-learning platform. He mainly focuses on DevOps, system management and automation technologies, as well as various cloud platforms mostly in the Microsoft space. He is a Microsoft Cloud and Datacenter Management MVP who absorbs knowledge from the IT field and explains it in an easy-to-understand fashion. Catch up on Adam's articles at adamtheautomator.com, connect on LinkedIn or follow him on Twitter at @adbertram or the TechSnips Twitter account @techsnips_io.