PowerShell Pipeline
Organizing Your PowerShell Code Using Regions
If you want to group parts of your code for debugging purposes or simple readability, the PowerShell ISE has the answer.
Keeping your code organized is sometimes just as important as the code actually working. If you can ensure that parts of your code are grouped together, it can help with the debugging process or to ensure that someone else who is reading your code (or the future you) can better read where everything is.
Regions were made available way back in PowerShell v.3 in the Integrated Scripting Environment (ISE), allowing you to group together sets of code or things such as parameters or variables that you wanted to keep together and could be updated by whomever is going to run the script.
An example of using the region formatting includes the keyword region followed by some sort of comment that describes what the group is on one line, followed by the code during the subsequent lines, and then ending with the keyword endregion and usually followed by the same comment as the beginning region.
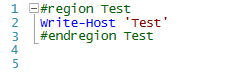
#region Test
Write-Host 'Test'
#endregion Test
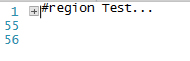
What isn't evident by this code example and more evident in the image below is that once you have the completed region blocks typed out, there will be a "-" at the beginning region signaling that you can minimize this group down to just the comment.
Not only can you group the code together with a region, but you are also able to fold the code so that a long collection of your PowerShell code can simply be folded into a single line to avoid taking up precious screen real estate if you have no need to write or debug that section of code. As you can see below, once you fold the code in, our minus sign becomes a plus (+) sign that shows the code has been folded. By clicking on the plus sign, the code will be unfolded and displayed for you to look at.
Going from 50-plus lines of code on your screen of stuff that you are not interested in at the time to only looking at a single line makes a world of difference.
A "gotcha"
that I want to cover is that the region keyword is case-sensitive in that you can only use a lowercase region and end region to properly group your code. Not using the lowercase words will result in the ISE engine being unable to tell that these are supposed to be grouped together and not just regular comments in your code, as shown in the image below.
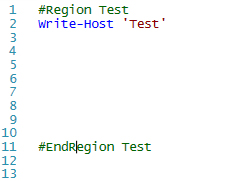
Note the lack of the "minimize" dash at the top-left of the beginning region keyword. This is definitely something that you want to keep in mind when you are writing your code and are looking to use the region blocks.
You can also nest multiple regions within one another. Just be careful when doing this that you properly end the region to ensure that the region is not being closed by the wrong end region.
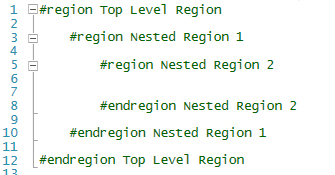
This is also another good reason why you want your beginning region and ending region to have the same comment as it makes managing them much easier to view and troubleshoot when things don't appear to be lining up.
With all of these regions now to collapse and expand, surely there is a way to quickly collapse all of them in case you just want to see the folded code and the region comments so that you can find the region that you want to expand and look deeper into. Lucky for us, we can do this using a keyboard shortcut, Ctrl+M, which will quickly toggle the regions by collapsing all of them or expanding them. Keep in mind that nested regions will be hidden from view by the outer-most region, so if you want to view the other regions within the top region, then you will have to manually expand it out.
For one last fun thing you can do, you can programmatically toggle the regions using the following line of code:
$psISE.CurrentFile.Editor.ToggleOutliningExpansion()
Typing this out in the ISE console and running it will produce the same results as using the keyboard shortcut that I described earlier.
That is all to working with regions in the PowerShell ISE. If you are looking to group parts of your code for various reasons or just want things to look more organized for the sake of readability, you can use this tip to accomplish just that!
About the Author
Boe Prox is a Microsoft MVP in Windows PowerShell and a Senior Windows System Administrator. He has worked in the IT field since 2003, and he supports a variety of different platforms. He is a contributing author in PowerShell Deep Dives with chapters about WSUS and TCP communication. He is a moderator on the Hey, Scripting Guy! forum, and he has been a judge for the Scripting Games. He has presented talks on the topics of WSUS and PowerShell as well as runspaces to PowerShell user groups. He is an Honorary Scripting Guy, and he has submitted a number of posts as a to Microsoft's Hey, Scripting Guy! He also has a number of open source projects available on Codeplex and GitHub. His personal blog is at http://learn-powershell.net.