PowerShell Pipeline
Managing Local Groups in PowerShell
Here's how to create, add and remove members of a group.
It is one thing to report on the groups that exists and their members, but what if you want to create a new group, or add/remove members of a group? Fortunately with PowerShell we can accomplish this with little effort. Using the Active Directory Service Interface (ADSI) provider to hook into a local or remote computer, we can begin the process of managing local groups.
First off we need to make our ADSI connection to the local computer before can do anything else.
$Computer = $env:COMPUTERNAME

  $ADSI = [ADSI]("WinNT://$Computer")
Creating a Local Group
The first thing we will look at doing is creating a new local group on the system.
$Group = $ADSI.Create('Group', 'TestGroup')
Note that Create accepts two parameters, the first one is the schemaobject (in this case it is group) and the second parameter is the name of the group. We have only created the object for the group but have yet to actually apply the change. To do this, we will call SetInfo() which writes the information back to the account database.
$Group.SetInfo()
Now we have our group created and ready to either have members added to it or it can be added to another group. But first, let's add a description to this group just so we know what it is being used for.
$Group.Description  = 'This is a  test group for whatever'

  $Group.SetInfo()
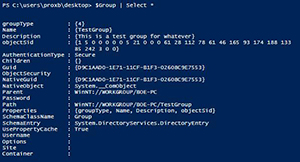 [Click on image for larger view.] Figure 1. Our newly created group, TestGroup.
Removing a Local Group
Ok, we have a group created but now it has been decided that we no longer need it. We should move forward with removing the group.
Again, we make our ADSI connection to the system.
$Computer = $env:COMPUTERNAME

  $GroupName = 'TestGroup'

$ADSI = [ADSI]("WinNT://$Computer")
Next we need to locate the group that we wish to delete. We will save this to a variable as it will be used next when we need to specify the adsi object to delete.
$Group = $ADSI.Children.Find($GroupName, 'group')
With the group now saved, we can move forward with deleting the local group from the system. We can use the Remove() method of the $ADSI.Children property and only need to specify the adsi object to do so.
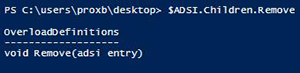 [Click on image for larger view.] Figure 2. The remove method of the System.DirectoryServices.DirectoryEntries object.
$ADSI.Children.Remove($Group)
And like that, our local group has now been removed from the system.
Adding a User to a Group
Let's assume that we didn't remove the TestGroup group from the system (you can go ahead and re-run the code to re-create the group) and now we need to add an account to this group.
As before, we will take the necessary steps to connect to the local system and locate the group that we plan to add accounts to for membership.
$Computer = $env:COMPUTERNAME

  $GroupName = 'TestGroup'

  $ADSI = [ADSI]("WinNT://$Computer")

$Group = $ADSI.Children.Find($GroupName, 'group')
Now we have to specify an account to add to the local group. In this case, I want to add my own account to this group. I want to specify the adsi path to my local user account when adding it to the group.
$User = $env:USERNAME

  $Group.Add(("WinNT://$computer/$user"))
We can verify the membership by running the following  command:

  $Group.psbase.invoke('members')  | ForEach {

  $_.GetType().InvokeMember("Name","GetProperty",$Null,$_,$Null)

}
 [Click on image for larger view.] Figure 3. Showing the account has been added to the new group.
Lastly, we should know how to remove a user from a local group if the need arises. Again, we make the same type of ADSI connection to the system that has the group with the user that we need to remove.
$Computer = $env:COMPUTERNAME

  $GroupName = 'TestGroup'

  $ADSI = [ADSI]("WinNT://$Computer")

$Group = $ADSI.Children.Find($GroupName, 'group')
In the same manner that we added a user to a group, we will also remove the account from the group. This time we will be using the Remove method.
$User = $env:USERNAME

  $Group.Remove(("WinNT://$computer/$user"))
Again, we can verify that our account has now been removed from the group using the same code that we used before.
 [Click on image for larger view.] Figure 4. Verification that the account is no longer a member of the TestGroup.
With that, you can now use these code snippets to manage the local groups on one or more systems. Whether it is creating groups, adding or removing members from a group, PowerShell can help pave the path to your success!
About the Author
Boe Prox is a Microsoft MVP in Windows PowerShell and a Senior Windows System Administrator. He has worked in the IT field since 2003, and he supports a variety of different platforms. He is a contributing author in PowerShell Deep Dives with chapters about WSUS and TCP communication. He is a moderator on the Hey, Scripting Guy! forum, and he has been a judge for the Scripting Games. He has presented talks on the topics of WSUS and PowerShell as well as runspaces to PowerShell user groups. He is an Honorary Scripting Guy, and he has submitted a number of posts as a to Microsoft's Hey, Scripting Guy! He also has a number of open source projects available on Codeplex and GitHub. His personal blog is at http://learn-powershell.net.