PowerShell Pipeline
Zipping Items Using the PowerShell V5 Cmdlets
You can either do it long way or the easy way.
For a long time, we have been zipping files and folders using various approaches in PowerShell that range from the 7zip libraries to using System.IO.Compression.FileSystem or the PowerShell Community Extensions to accomplish this task. There is definitely nothing wrong with either of these approaches, but wouldn't be nicer if we have a cmdlet that is already available to us to use to zip the files and folders vs. building your own functions from scratch to do this?
Well, wait no more! With PowerShell V5, we now have two new cmdlets which finally bring us the zipping that we have been waiting for! The new cmdlets are called Compress-Archive and Expand-Archive, both part of the Microsoft.PowerShell.Archive module.
 [Click on image for larger view.] Figure 1. Looking at the cmdlets to zip and unzip items.
Using Compress-Archive allows you to zip your items up while Expand-Archive is used to unzip the items. Pretty simple, right?
Zipping Items using Compress-Archive
Let's start out by looking at the Compress-Archive cmdlet so we can begin zipping up some items. Looking at the command syntax we can see a few interesting things such as being able to set the CompressionLevel of the zip archive and then using –Update to add items to an existing zip archive.
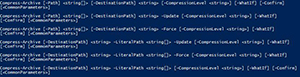 [Click on image for larger view.] Figure 2. Syntax for Compress-Archive.
Covering the CompressionLevel parameter, you can specify one of the following values to set the compression on the zip folder.
| Fastest |
Use the fastest compression method available to decrease processing time; this can result in larger file size |
| NoCompression |
Do not compress the source files. |
| Optimal (Default) |
Processing time is dependent on file size. |
The beauty of this cmdlet is that you can run through an entire directory and simply pipe the output into Compress-Archive and specify the destination zip archive. If you choose not to do this, then just have a collection of items to place in the –Path parameter.
Get-ChildItem .\ToZip | Compress-Archive -DestinationPath "$PWD\ToZip.zip" -Verbose
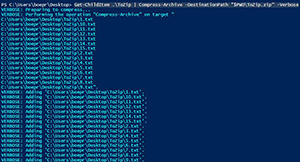 [Click on image for larger view.] Figure 3. Adding items to a zip archive.
With just a simple one-liner, I have copied all of these files to a zip archive.
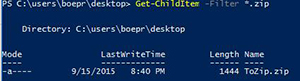 [Click on image for larger view.] Figure 4. Verifying the zip archive exists.
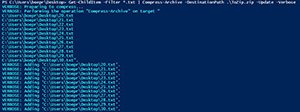
Let's say that I have some new files that needed to be added to the zip archive. I will just use –Update and add them into the mix.
Get-ChildItem -Filter *.txt | Compress-Archive -DestinationPath .\ToZip.zip -Update -Verbose
 [Click on image for larger view.] Figure 5. Adding items to an existing zip archive.
Simple with no issues at all. We can quickly and easily add items to a zip file without much effort at all.
One important thing to note that since this uses the System.IO.Compression.ZipArchive class for compressing the items, you cannot compress a file larger than 2GB in size.
Expanding Zip Files using Expand-Archive
Adding files to a zip file is one thing, but at some point we may need to extract those items from the zip file. Similar to what we did with Compress-Archive, we are going to take a look at the command syntax and see what is available to us.
 [Click on image for larger view.] Figure 6. Syntax for Expand-Archive.
Not as many things here as what we found with Compress-Archive, but we can certainly make use of what is available to pull files from a zip archive. Basically we can specify the zip file that we plan to extract and then specify a destination path to put the files.
We can now go back to our zip file and extract all of those files from it and place them in another folder for viewing.
First thing that we need to do is to create a folder to store those files.
New-Item -Name ZipFiles -ItemType Directory
Next up is to extract the files from the zip archive and place them in the ZipFiles directory.
Expand-Archive -Path .\ToZip.zip -DestinationPath .\ZipFiles -Verbose
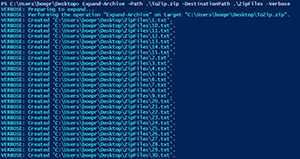 [Click on image for larger view.] Figure 7. Unzipping a zip file.
It appears that we have some files waiting for us in the ZipFiles folder, but we should just double check that just to be sure that it worked the way we think it should.
Get-ChildItem .\ZipFiles
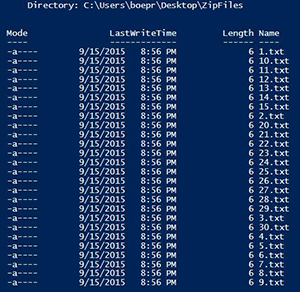 [Click on image for larger view.] Figure 8. Verifying that files have been unzipped.
Perfect! Our files have been extracted from the zip archive and are now awaiting our review. Unfortunately, we cannot yet pull single files out from the zip archive, but maybe one day we will have this capability to open a zip and pull out specific files to extract.
So with that, we have stepped through a very much welcome, yet simple capability that has been brought to us in PowerShell V5. I hope that this helps you out with whatever project that you might be working on!
About the Author
Boe Prox is a Microsoft MVP in Windows PowerShell and a Senior Windows System Administrator. He has worked in the IT field since 2003, and he supports a variety of different platforms. He is a contributing author in PowerShell Deep Dives with chapters about WSUS and TCP communication. He is a moderator on the Hey, Scripting Guy! forum, and he has been a judge for the Scripting Games. He has presented talks on the topics of WSUS and PowerShell as well as runspaces to PowerShell user groups. He is an Honorary Scripting Guy, and he has submitted a number of posts as a to Microsoft's Hey, Scripting Guy! He also has a number of open source projects available on Codeplex and GitHub. His personal blog is at http://learn-powershell.net.