PowerShell Pipeline
Enhance Your Reporting Using HTML in PowerShell
Spit out a more pleasant looking report using this PowerShell method.
In our day-to-day activities of working with PowerShell, it is likely that you have been asked to generate a report of some kind and provide that to your boss, or even your boss's boss. Either way, the common approach to this might be to send the output to a file by means of a text file or CSV file. While there is nothing necessarily wrong with this at all, sometimes it is nice to provide a richer report to make the report more presentable to the viewer.
Building an HTML report can be as simple as taking your output and sending it to the ConvertTo-HTML cmdlet and then sending that to a file or embedding it into an email that is sent out.
You might be asking, is it really that simple? Sure it is! Just watch below.
Get-Service | ConvertTo-HTML | Out-File Services.html

  Invoke-Item Services.html .
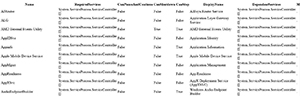 [Click on image for larger view.] Figure 1. Our first HTML report attempt showing services.
This is just a small snapshot of the actual report, but you can see that when I use Invoke-Item, it will open up the file using the default application, if applicable. What we have is an HTML report showing all of the services on my system. Of course, I need to make some adjustments as a few of the properties flatten down to a typename instead of the actual data that we need. That is simply a matter of selecting the right properties and then formatting the data within the property so it looks nicer.
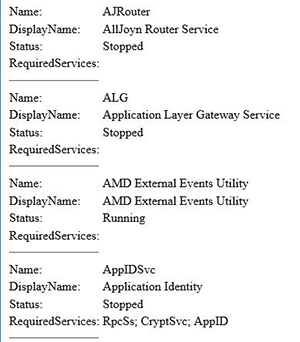
Get-Service | Select Name, DisplayName, Status, @{L='RequiredServices';E={$_.RequiredServices  -join '; '}}|

  ConvertTo-Html | Out-File Services.html

Invoke-Item Services.html
 [Click on image for larger view.] Figure 2. The second HTML report attempt with a little better formatting on properties.
That works and definitely makes it a little more readable. Note that this is using a table by default. If we wanted a list view we can use the –As List parameter in ConvertTo-HTML to make it look more like a list.
Get-Service | Select Name, DisplayName, Status, @{L='RequiredServices';E={$_.RequiredServices  -join '; '}}|

  ConvertTo-Html -As List | Out-File Services.html

Invoke-Item Services.html
 [Click on image for larger view.] Figure 3. Showing off a List view in our HTML report.
Personally, I am more into using tables to display data, but there are always places to use a list.
So far these have been the simplest of reports that we have been building with just showing off the data. But there is more to the cmdlet than what I have shown so far. You can add content at the end of the HTML report and even write your own HTML code and create some amazing reports. For instance, I will add a title and a footer at the end showing when and where this report was created.
$Services = Get-Service | Select Name, DisplayName, Status, @{L='RequiredServices';E={$_.RequiredServices  -join '; '}}  | Select -first 5

  $Report = 'ServicesReport.html'

  $pre = @"

  <div style='margin:  0px auto; BACKGROUND-COLOR:Black;Color:White;font-weight:bold;FONT-SIZE:  16pt;TEXT-ALIGN: center;'>

  $Env:Computername  Services Report

  </div>

  "@

  $post = "<BR><i>Report generated on $((Get-Date).ToString()) from $($Env:Computername)</i>"

  $Services | ConvertTo-HTML -PreContent  $pre -PostContent  $post |  Out-file $Report

Invoke-Item $Report
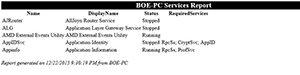 [Click on image for larger view.] Figure 4. Adding some custom HTML code to create a title and footer at the end of the report.
As you probably have noticed, I first gathered my services (only 10 this time to better show everything off) and then used some HTML code to create my title and also my post content footer. ConvertTo-HTML has parameters (-Pre and -Post) which allow me to place these snippets in their proper location on the report.
With that, we have a nice looking report that can be used to show not only the system and services, but also provides a footer at the bottom to show where the report came from as well as when it was created. This is useful if we have a scheduled job running to generate these reports.
While this is already a great start to reports and will definitely make a better looking report than just a text file, but stay tuned for my next article where we build on what we have done here to create some truly great reports!
About the Author
Boe Prox is a Microsoft MVP in Windows PowerShell and a Senior Windows System Administrator. He has worked in the IT field since 2003, and he supports a variety of different platforms. He is a contributing author in PowerShell Deep Dives with chapters about WSUS and TCP communication. He is a moderator on the Hey, Scripting Guy! forum, and he has been a judge for the Scripting Games. He has presented talks on the topics of WSUS and PowerShell as well as runspaces to PowerShell user groups. He is an Honorary Scripting Guy, and he has submitted a number of posts as a to Microsoft's Hey, Scripting Guy! He also has a number of open source projects available on Codeplex and GitHub. His personal blog is at http://learn-powershell.net.