PowerShell Pipeline
Building Your First UI Using PowerShell and WPF, Part 1
With many different ways to creating a UI, here's the best route.
A while back, I had mentioned using Out-GridView to build a UI without really doing anything that complicated. As fun as that is, we can have even more fun by making use of Windows Presentation Foundation (WPF) to build out a UI that you can hand off to someone else or another group to make use of. This should not be confused with using WinForms, which is another technology to build a UI (but will not be covered here). The benefits of this is that you can build a tool to perform an action that folks who refuse to use PowerShell due to fears of the command line or something else now have an easy to use interface to run commands or view information in the familiar UI where buttons can be pushed and scrollbars and be scrolled.
There are a couple of options that you can look at to create the UI. You can take a dive into .NET by making use of the available types to build out your UI. That is a little more complicated than what we want to show here, but I definitely wanted to mention it.
The other option that I am going to present here is building out the UI using the Extensible Application Markup Language (XAML) language. What is XAML? Well, if you have ever used XML or even seen it (odds are you have), then you can tell that it is structured text that allows store and transport data and represents a data structure. Now, you can do the hard job of coding your own XAML to learn how things work and earn that badge of pain (OK, it's not really that painful) or you can download Visual Studio Express and build out your form in an easier way.
Enough of the boring setup and on to some great stuff that we are going to do! Assuming that you have downloaded and installed Visual Studio, the next step is to open it up and ensure that we pick the right type of project to start.
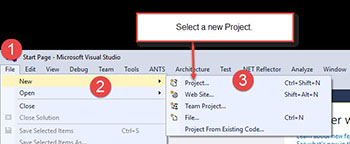 [Click on image for larger view.] Figure 1. First steps to creating a new project.
To begin a new project, you will need to do the following:
- Go to File.
- Bring your cursor over to New.
- In the next menu, select Project to go to the next window to pick a project.
Next up is the selection process. We want to make sure that we pick out the C# WPF Application and also to give it a name.
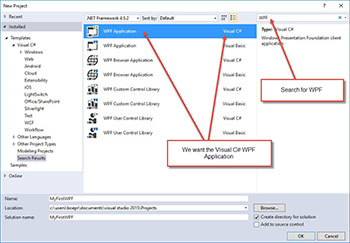 [Click on image for larger view.] Figure 2. Ensuring that we select the proper project.
Once you are done with that, click OK and you will be presented with the initial WPF window to start building your first UI.
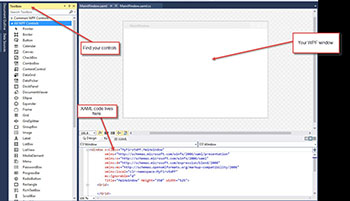 [Click on image for larger view.] Figure 3.First look at the WPF project.
At the initial window, you should look at the upper left hand corner for the Toolbox and ensure that it is pinned so you can take a look at all of the controls which are available to you. In the middle is your WPF window. From the toolbox, you can drag and drop those controls into the middle window to begin building out your UI. The bottom window pane shows your XAML code that updates as you add and remove various controls.
You have heard me mention controls during this article and may not know quite what I mean. So let me define that for you. A control is an object in WPF that could be a parent or a child of another control such as a button or a textbox. Each control has a set of properties, methods and events (no different then what we see day to day in PowerShell) that can be used for various purposes.
My goal is to create a simple program that will accept a computer name and allow me to perform a few actions such as viewing all running services, processes and current disk space on that computer.
To start out, I want to organize my things so I will drag and drop a few Group boxes into the window.
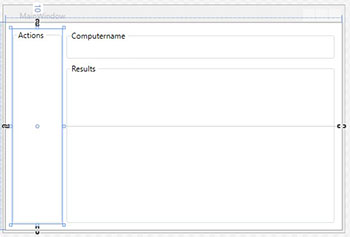 [Click on image for larger view.] Figure 4. Building out our first WPF UI.
As you start adding controls, you will notice the bottom right hand window called Properties and that it has a lot of options for each control. In this case, I only wish to give each group box a usable name as well as giving it a header name, which is what you see in the image above so each group makes sense.
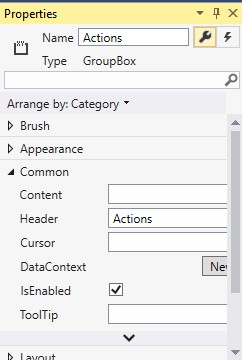 [Click on image for larger view.] Figure 5.A look at the properties of a control.
The properties is just a taste of all of the things that you can do to change the appearance and customize each control. Now that I have my groupings defined, I can now build out the buttons and textboxes to handle our computer name input and the output when the commands have been run based on the button clicks. By the way, there is a handy search box to type out what property you are looking for so you can avoid a lot of scrolling around.
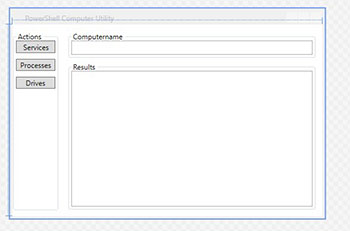
The end result of my dragging, dropping and updating of properties shows the promise of a little utility that could be useful to someone.
 [Click on image for larger view.] Figure 6. The nearly finished product in Visual Studio.
Once I am sure that this is all set and ready to go, I will copy and paste the XAML code at the bottom and place it into a here string in the PowerShell ISE. And while we are at it, we will go ahead and cast this as an XML type so it is easier to work with.
There is a distinct chance that your XAML contains a couple of items which do not play well once we bring PowerShell into the picture. Look for X:Class and a mc:Ignorable properties that are residing in your XAML code in the Window and remove them. When we attempt to load the XAML into the XAMLReader, it will throw an error about those nodes.
Your code should end up looking similar to this:
[xml]$XAML  = @"

  <Window xmlns="http://schemas.microsoft.com/winfx/2006/xaml/presentation"

  xmlns:x="http://schemas.microsoft.com/winfx/2006/xaml"

  xmlns:d="http://schemas.microsoft.com/expression/blend/2008"

  xmlns:mc="http://schemas.openxmlformats.org/markup-compatibility/2006"

  xmlns:local="clr-namespace:MyFirstWPF"

  Title="PowerShell Computer Utility" Height="350"  Width="525">

  <Grid>

  <GroupBox  x:Name="Actions" Header="Actions"  HorizontalAlignment="Left" Height="299"  VerticalAlignment="Top" Width="77" Margin="0,11,0,0">

  <StackPanel>

  <Button  x:Name="Services_btn" Content="Services"/>

  <Label  />

  <Button  x:Name="Processes_btn" Content="Processes"/>

  <Label  />

  <Button  x:Name="Drives_btn" Content="Drives"/>

  </StackPanel>

  </GroupBox>

  <GroupBox  x:Name="Computername" Header="Computername"  HorizontalAlignment="Left" Margin="92,11,0,0"  VerticalAlignment="Top" Height="45" Width="415">

  <TextBox  x:Name="InputBox_txtbx" TextWrapping="Wrap"/>

  </GroupBox>

  <GroupBox  x:Name="Results" Header="Results"  HorizontalAlignment="Left" Margin="92,61,0,0"  VerticalAlignment="Top" Height="248" Width="415">

  <TextBox  x:Name="Output_txtbx" IsReadOnly="True"  HorizontalScrollBarVisibility="Auto"  VerticalScrollBarVisibility="Auto" />

</GroupBox>
    </Grid>

  </Window>

  "@
From here, the next step is to load the XAML into the reader and create our WPF window object, which will serve as the basis to connect to the other controls.
$reader=(New-Object System.Xml.XmlNodeReader  $xaml)

  $Window=[Windows.Markup.XamlReader]::Load(  $reader )
If I wanted, I could now display our Window using ShowDialog(), but I want to create connections to our other controls first. For that I will use XPath via the SelectNodes method of the XML object and then use $Window.FindName() to connect to the controls. I'll ensure that I maintain that connection by creating a variable for each control that I find.
#Connect to Controls

  $xaml.SelectNodes("//*[@*[contains(translate(name(.),'n','N'),'Name')]]")  | ForEach {

  New-Variable  -Name $_.Name -Value $Window.FindName($_.Name) -Force

  }
Now we can display our window and see just what it looks like outside of Visual Studio.
$Null = $Window.ShowDialog()
 [Click on image for larger view.] Figure 7. First look at the WPF UI running via PowerShell.
Not too bad at all! The next steps are to look at creating events and handling those events for specific controls and making sure that everything works like we want it to. Check out part two of this series and we will step through this process!
About the Author
Boe Prox is a Microsoft MVP in Windows PowerShell and a Senior Windows System Administrator. He has worked in the IT field since 2003, and he supports a variety of different platforms. He is a contributing author in PowerShell Deep Dives with chapters about WSUS and TCP communication. He is a moderator on the Hey, Scripting Guy! forum, and he has been a judge for the Scripting Games. He has presented talks on the topics of WSUS and PowerShell as well as runspaces to PowerShell user groups. He is an Honorary Scripting Guy, and he has submitted a number of posts as a to Microsoft's Hey, Scripting Guy! He also has a number of open source projects available on Codeplex and GitHub. His personal blog is at http://learn-powershell.net.