PowerShell Pipeline
PowerShell Basics: Working with Arrays
Mastering arrays will massively improve your quality of life when it comes to PowerShell.
Working in PowerShell you will have undoubtedly dealt with arrays in one fashion or another. Sometimes you may not have even realized that you had an array when you call out a cmdlet such as Get-Process which brings back an array of System.Diagnostics.Process objects that you can then sort or further work with. So if you are not familiar with what an array is, let me give you a quick description before we move much further on into this. An array is a data structure that contains any number of a collection of items of a single type or many types. They can also hold collections of collections, as well, within itself. Note that arrays can be strongly typed, meaning that you specify the only allowable type that is accepted in a particular array.
The quickest way to show this is to provide a collection of integers starting with 1 and ending with 5.
$Array = 1..5

  $Array.GetType().Fullname

$Array
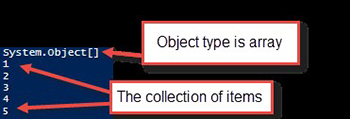 [Click on image for larger view.] Figure 1. Looking at the type of array.
Here we see that the type of $Array is a System.Object[] with the square brackets showing that this is, in fact, a collection of items or an array. Calling our variable shows that there are indeed five items, which is 1 thru 5.
When working with arrays it is important to understand that the index (or location within a collection) starts at zero instead of one. So if you wanted to look at the first item in the array you would make sure to state that you are looking at the zero index of the array. So how does one perform this operation to look at a particular index on the array? We use an approach called array slicing to look at various points in the array by calling the variable and then supplying square brackets with the index number that we want to view.
$Array[3]
$Array[1..3]
$Array[0,2,4]
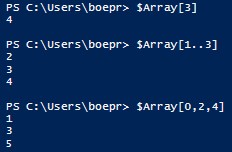 Figure 2. Slicing into an array for data.
Remember that the index starts at 0, so if I wanted to look at the fourth item in the array, I am going to specify the index value of 3. Besides just finding a single item in an array, I can also look for a range of items as well just by giving the range of numbers within the brackets. Same goes for specific locations, just use a comma to separate each index that you want to view. Also a fun fact, if you want to look at the last item in an array, just specify -1 and that will get you the last item.
If you want to know how many items are in an array, just use the Count alias property and it will return the current number that are in the array.
$Array.Count
In this case, it will only return 5 as we have only that many items currently in the array.
Now that we have spent some time looking at how to view the contents of an array, let's take a quick look at creating arrays other than by what is returned from a cmdlet or creating a collection with a range of numbers. A common approach to creating an empty array is by calling @() and then adding data by using +=, which actually creates a brand new array from the original with the new item added to it. Here is an example:
$Array =  @()

  $Array += 'This'

  $Array += 'is'

  $Array += 10

$Array
The result when viewing this is what you would expect -- the first two items are string types and the last one is an integer. I mentioned strongly typed arrays earlier on and that bears an example to see what happens if I wanted an array that is strongly typed to an integer.
[int[]]$Array  = @()

  $Array +=10

  $Array += 5

  $Array += 'Test'

$Array
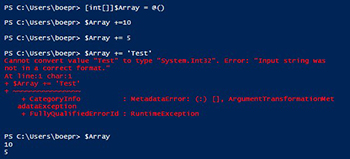 [Click on image for larger view.] Figure 3. Working with a strongly typed array.
By strongly typing the array, anything other than an integer that couldn't be converted to an int32 will throw an error.
Now what is a potential problem with the way that I am creating these arrays? If you answered that it is hard to remove an item from an existing array, then you would be correct! While adding items is not an issue, there is not a good mechanism with this current approach to removing an array unless you build a new array by performing a filter against the original array to exclude an item while saving the results of everything else that wasn't filtered. This is odd because there is a Remove method that appears to be readily available to you to use except that using it will also provide you with a message saying that it couldn't be removed due to the array being a fixed size.
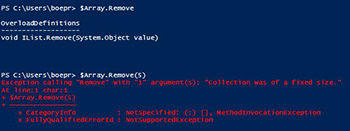 [Click on image for larger view.] Figure 4. Finding a fault in removing data from an array.
Unfortunate, yes, but this won't deter us from having an array that is easier to add and remove items from.
Enter System.Collections.ArrayList which allows us to create an empty array which we can add items to as well as remove items with little effort at all. The easiest way to create the initial empty collection is to use New-Object and provide the type like below:
$Array = New-Object System.Collections.ArrayList
By the way, if you are following along each line of code, make sure that you remove the array variable that was created earlier using Remove-Variable –Name Array. This will ensure that you are not stuck with the strongly typed variable that we created earlier.
With our new Array created, we can add to it by using the Add() or AddRange() methods.
1..5 | ForEach {

  $Array.Add($_)

}
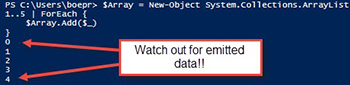 [Click on image for larger view.] Figure 5. A different approach to adding items to an array using an ArrayList.
Did you notice the extra data being outputted when we add an item to the Array? This is telling you at what index the new item is being added into. While it definitely has its place in the ecosystem, this is not something that I want to be showing at any point in a script or function. So in that case, I will just use $Null = $Array.Add() to send that output to $Null and not have to deal with it anymore. The same will not need to be done with Remove() as it does it quietly, which is a great segue into our next demo showing how to remove a particular item from an array.
$Array.Remove(2)

  $Array.Remove(4)

$Array
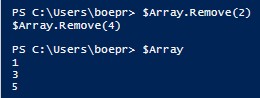 Figure 6. Removing items from an ArrayList.
And like that, the items that we wanted to get rid of are now no longer a part of the array!
Now with this information you should now have a better understanding of arrays in PowerShell and can begin using them in your day-to-day activities!
About the Author
Boe Prox is a Microsoft MVP in Windows PowerShell and a Senior Windows System Administrator. He has worked in the IT field since 2003, and he supports a variety of different platforms. He is a contributing author in PowerShell Deep Dives with chapters about WSUS and TCP communication. He is a moderator on the Hey, Scripting Guy! forum, and he has been a judge for the Scripting Games. He has presented talks on the topics of WSUS and PowerShell as well as runspaces to PowerShell user groups. He is an Honorary Scripting Guy, and he has submitted a number of posts as a to Microsoft's Hey, Scripting Guy! He also has a number of open source projects available on Codeplex and GitHub. His personal blog is at http://learn-powershell.net.