PowerShell How-To
Go Back To School with PowerShell Classes
Classes extends the usefulness of PowerShell for both admins and devs.
- By Adam Bertram
- 08/25/2016
When PowerShell was introduced in 2006, it was created to be a replacement for an old command line and obscure batch files and VBscript scripts. It was meant to be a scripting language for system administrators to help them with ad-hoc automation tasks. It's 2016 now, and PowerShell has grown to so much more. I never thought that PowerShell Developer would ever be a job, but it is.
As part of this transformation from a simple scripting language to development language, Microsoft has decided to introduce a traditional programming language concept to PowerShell as of v5: classes. Classes are yet another step to treating PowerShell more as a developer's tool rather than just a system administrator's automation tool.
Let's see how a developer or system administrator might begin using classes in PowerShell v5.
First of all, before we get into how to create classes, I'd like to briefly go over what a class is. Classes can be thought of as object templates. If you've used PowerShell's [pscustomobject] type accelerator or simply used New-Object at some point, you've created an object, but you've been relying on someone else's template or class to create that object. With PowerShell classes, you can not only create the object but the template that it comes from as well.
At its simplest, creating a class in PowerShell, you'll use the new class keyword followed by the class name:
class Bike {}
This creates a Bike class with no constructors, properties or methods.
 [Click on image for larger view.] Figure 1.
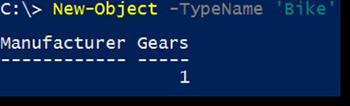
You can also instantiate a new object from this class by using New-Object, but since nothing is going on here, the object is pretty boring.
 [Click on image for larger view.] Figure 2.
Let's first add some properties to our class. We can do this just like with function parameters. Just specify the type of the property and the name right below the class definition.
Class Bike {

  [string]$Manufacturer

  [int]$Gears  = 1

  }
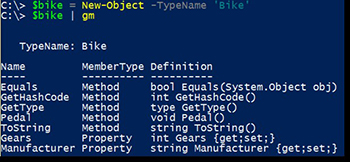
I'll instantiate the object, and you can see the properties appear along with the default value I set for the $Gears property.
 [Click on image for larger view.] Figure 3.
Let's now add some methods to this class. You can pedal a bike so let's add a Pedal() method to the Bike class.
Class Bike {

  [string]$Manufacturer

  [int]$Gears  = 1
[void] Pedal() {
}

  }
Now you can see that we have a Pedal() method with our class. Notice the [void] reference? That is the return type which indicates the type of output the method is supposed to return. In this case, Pedal() isn't returning anything but this could be any kind of object type like [string],[array],[int] or even another custom object type.
 [Click on image for larger view.] Figure 4.
Now let's add a constructor. What's a constructor or ctor as you might see it referred to? A constructor is a way to instantiate or create an object from the class. A constructor is a sort of like function parameter sets. It's a method that is called that includes a unique set of parameters that can be passed to the class to create an object. By default, if you don't specify a constructor, PowerShell creates one for you but essentially does nothing. To create a non-default constructor, you'll need to name it the same name as your class followed by the parameters you'd like to be in this constructor.
Class Bike {

  Bike($Manufacturer,  $Gears) {

  $this.Manufacturer  = $Manufacturer

  $this.Gears  = $Gears

  }
            [string]$Manufacturer

  [int]$Gears  = 1
[void] Pedal() {
}

  }
In the example above, I'm specifying two parameters to the constructor which then sets the class properties to what I pass as the constructor parameter values. I do this by using the $this keyword. The $this keyword represents the current instance of the class.
Below I'm using the constructor I just built and passing a value to Manufacturer and Gears value to it. It's then, setting the class properties Manufacturer and Gears to those values. I don't have to use the same name, though. I could have used anything for the constructor parameters.
 [Click on image for larger view.] Figure 5.
There are lots of other cool things you can do with classes. If you'd like to dive deeper into the topics we talked about or learn about overloading and scopes as well, I highly encourage you to check out some great videos by Punit Ganshani.
About the Author
Adam Bertram is a 20-year veteran of IT. He's an automation engineer, blogger, consultant, freelance writer, Pluralsight course author and content marketing advisor to multiple technology companies. Adam also founded the popular TechSnips e-learning platform. He mainly focuses on DevOps, system management and automation technologies, as well as various cloud platforms mostly in the Microsoft space. He is a Microsoft Cloud and Datacenter Management MVP who absorbs knowledge from the IT field and explains it in an easy-to-understand fashion. Catch up on Adam's articles at adamtheautomator.com, connect on LinkedIn or follow him on Twitter at @adbertram or the TechSnips Twitter account @techsnips_io.