PowerShell Pipeline
Extending the Use of the PowerShell ISE
The ability to create and extend menus has been a huge quality of life improvement in the latest PowerShell version.
If you work in PowerShell and write scripts, then you have most likely used the PowerShell Integrated Scripting Environment (ISE) to do a lot of your coding. In its earlier versions, this was an OK solution to write out your code and test it, but it was missing a variety of features such as code folding, syntax highlighting, etc. Fortunately a lot of things have been fixed or updated since PowerShell V3 which makes using the ISE much nicer without resorting to third-party products that you may or may not be able to bring into your environment.
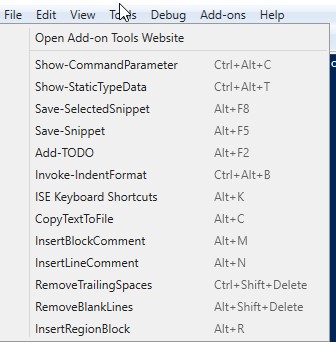
But the ISE isn't just capable of being a scripting environment to write code. Thanks to the PowerShell team, you can actually extend the use of the ISE by creating your own custom menus complete with keyboard shortcuts to run extra code that can be used for a variety of functions such as cleaning up code or just filling in places where the ISE isn't doing certain things such as formatting code automatically.
 Figure 1. Various custom add on menus.
Before we can get started, we should take a look at how we actually get to the point of writing our own custom menus for the ISE. The starting object that we should look is $PSISE which is essentially our root object for the ISE to manipulate mostly everything in the ISE. Note that this variable is only available while you are running it in the ISE.
 [Click on image for larger view.] Figure 2. Looking at the ISE object.
We see that there are a number of properties to look at ranging from the current PowerShell ISE tab to the current file as well as Options that you can update such as the color scheme for syntax highlighting and the code editor panes.
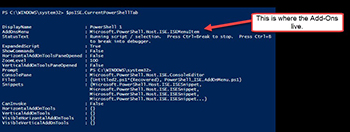
Digging deeper into the CurrentPowerShellTab is where we can find out exactly where the Add-Ons are residing at.
 [Click on image for larger view.] Figure 3.A deeper dive into the ISE object.
 [Click on image for larger view.] Figure 4. Looking at the main menu for add-ons.
The AddOnsMenu holds a collection of submenus, which is where we would place our menus at as they are created. Note that if you want any menu to persist when the ISE is started up that you should place them in your PowerShell ISE profile..
 [Click on image for larger view.] Figure 5. Looking at the profile locations.
There is an Add() method under the SubMenus object which takes a number of parameters that we need to provide in order to create a submenu add-on for the ISE.
$psISE.CurrentPowerShellTab.AddOnsMenu.SubMenus.Add
 [Click on image for larger view.] Figure 6. Parameters required to create add on menu.
I'm only concerned with the first overload definition here that says we need a DisplayName, a scriptblock containing the code that will run when the menu is used and a keyboard shortcut because why mess with a couple of menu clicks with a mouse when a keyboard will do?
Let's take a look at one of my examples and walk through what is happening in the code.
#region CopyTextToFile - Alt+C

  [void]$psISE.CurrentPowerShellTab.AddOnsMenu.SubMenus.Add("CopyTextToFile",{

  $Editor  = $psISE.CurrentFile.Editor

  $SelectedText  = $Editor.SelectedText

  $File = $psISE.CurrentPowerShellTab.Files.Add()

  $File.Editor.Text = $SelectedText

  $File.Editor.SetCaretPosition(1,1)

  },"Alt+C")

#endregion CopyTextToFile - Alt+C
I'm using [void] here to prevent unnecessary output from being displayed when I save the add-on menu as a sub-menu. I already know what is going to be happening so any output is unneeded. From there I have a display name, CopyTextToFile in this case, and then add my scriptblock of code that will run when this menu is used. You will notice that I make use of the Editor object gather information about the current script file that I am working with. The SelectedText will get the code that you have selected on the ISE and from there I create a new script file that I can then add the selected text to and then ensure that the starting caret position is at the beginning of the new file. At the very end of this is my keyboard shortcut of Alt+C.
After running the code, you can then see it available from the Add-Ons menu that not only shows the Display Name that we gave it but also shows the associated keyboard shortcut.
 [Click on image for larger view.] Figure 7. Viewing the newly created add on menu
All I have to do now is select some code and use my keyboard shortcut to take a snippet of code and place it in a new file.
This is really only the beginning to some of the amazing things that you can build within the ISE.
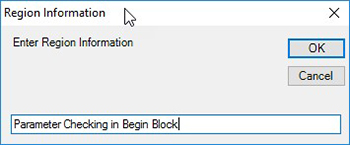
I have one last example to show before signing off for the day. This add on allows you to highlight a chunk of code in your script and then creates a region block around the code.
#region InsertRegionBlock - Alt+R

  [void]$psISE.CurrentPowerShellTab.AddOnsMenu.SubMenus.Add("InsertRegionBlock",{

  $Editor  = $psISE.CurrentFile.Editor

  Try {

  [void][Microsoft.VisualBasic.Interaction]

  } Catch  {

  Add-Type  –assemblyName Microsoft.VisualBasic

  }

  $Name = [Microsoft.VisualBasic.Interaction]::InputBox("Enter  Region Information", "Region Information")

  $CaretLine  = $Editor.CaretLine

  $SelectedText  = $Editor.SelectedText

  $NewText  = "#region  {0}`n{1}`n#endregion {0}" -f $Name,$SelectedText

  $Editor.InsertText($NewText)

  $Editor.SetCaretPosition($CaretLine, 1)

  },"Alt+R")

#endregion InsertRegionBlock - Alt+R
 [Click on image for larger view.] Figure 8. Pop up menu for the region add on.
 [Click on image for larger view.] Figure 9.
I have a script with many more examples besides the two that you have seen, available here. Feel free to fork the script and add your own items or provide any fixes that you happen to find and then submit a pull request so they can be a part of this repository.
Now with this knowledge you can go out and create your own add on menus on the ISE to help make your scripting experience much more pleasant!
About the Author
Boe Prox is a Microsoft MVP in Windows PowerShell and a Senior Windows System Administrator. He has worked in the IT field since 2003, and he supports a variety of different platforms. He is a contributing author in PowerShell Deep Dives with chapters about WSUS and TCP communication. He is a moderator on the Hey, Scripting Guy! forum, and he has been a judge for the Scripting Games. He has presented talks on the topics of WSUS and PowerShell as well as runspaces to PowerShell user groups. He is an Honorary Scripting Guy, and he has submitted a number of posts as a to Microsoft's Hey, Scripting Guy! He also has a number of open source projects available on Codeplex and GitHub. His personal blog is at http://learn-powershell.net.