PowerShell Pipeline
What I Like in PowerShell V5, Part 2: New Features
Continuing from where I left off with my previous article on some things that I like about PowerShelll V5, I am going to move away from the new cmdlets and parameters and instead look at some other features which are available in PowerShell V5 such as Classes, enhanced scriptblock logging, setting a global transcript and additional streams. I do want to remind you that I am not covering version 5.1 in this series and am just focusing on things that came out with version 5.0.
A Quick Look at Classes
PowerShell classes help define a type of object by building out its properties, methods and how you can create the object by using constructors within the class. The use for this was to support Desired State Configuration (DSC). But, as with most things in IT, something that had a singular purpose can quickly become used for other things that had not been thought of before. Although, I am willing to bet that the PowerShell team knew that the use of classes would extend far beyond just DSC use. Before this, we had to make do with New-Object PSObject for PowerShell V1/2,[pscustomobject] for PowerShell V3/4 and had to use Add-Member to build out script methods or we would write C# code and use Add-Type to call in the classes that were defined to use to create objects.
So with that, let's step through a small example of creating a class that includes the following items:
- Properties
- Hidden Property
- Method
- Default Constructor (no parameters)
- Constructor with parameters
class House {

  #Parameters  which define various parts of the house

  [string]$Color

  [int]$NumberBedrooms

  [int]$NumberBathrooms

  #The hidden  property is something that we do not want publicly shown when

  #the object  is displayed

  hidden[int]$NumberOwners
    #Methods are  defined here that an be used to do a variety of things

  #In this case  we have a Sell and Paint method to change owners of the house

  #or to change  the color of the house

  [void]Sell() {

  $This.NumberOwners =  $this.NumberOwners+1

  }

  [void]Paint([string]$Color) {

  $This.Color = $Color

  }
    #Constructors  are defined here to allow us different options to build the house

  #such as  using a default constructor or being able to supply different parameters

  House  () {

  $This.Color = 'White'

  $This.NumberBedrooms =  2

  $This.NumberBathrooms =  1

  $This.NumberOwners =  1

  }
    House  ([string]$Color) {

  $This.Color = $Color

  $This.NumberBedrooms =  2

  $This.NumberBathrooms =  1

  $This.NumberOwners =  1

  }

  House  ([string]$Color,[int]$NumberBedrooms)  {

  $This.Color = $Color

  $This.NumberBedrooms =  $NumberBedrooms

  $This.NumberBathrooms =  1

  $This.NumberOwners =  1

  }

  House  ([string]$Color,[int]$NumberBedrooms,[int]$NumberBathrooms)  {

  $This.Color = $Color

  $This.NumberBedrooms =  $NumberBedrooms

  $This.NumberBathrooms =  $NumberBathrooms

  $This.NumberOwners =  1

  }

  }
Here we have our properties at the top of our house class, followed by the methods which allow us to make changes to the house object and lastly we define our constructors on the house so we know how to build it properly. Also note the use of $This in the scriptblocks which means that it will use $This as the current object (being itself) to adjust the properties.
Now that we have defined our class, we can show some examples on building out the object with the allowed constructors that we have configured.
Fun fact: Also in PowerShell V5, there is now a New() static method which makes it easier to build out an object, but if you leave out the parenthesis, you can get a list of all of the possible ways to build the object by looking at the constructors.
[house]::New
 [Click on image for larger view.] Figure 1. Viewing the constructors of an object.
I'll go ahead and use the default constructor to build my house and then we can look at giving it a paint job later on.
$House = [house]::New()

  $House

  $House.Paint('Green')

$House
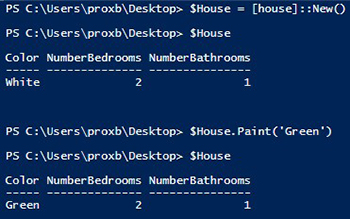 [Click on image for larger view.] Figure 2. Building an object and running a method against itself.
What you do not see is the NumberOwners property being shown. That is because we said to hide this property unless it is explicitly called.
$House.NumberOwners

  $House.Sell()

$House.NumberOwners
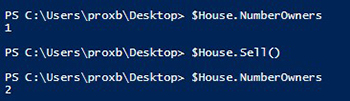 [Click on image for larger view.] Figure 3. Looking at the hidden property of an object.
While using classes may not be for everyone, I encourage you to at least check them out and see if they happen work with something that you are working on.
Defining a Global Transcript
This and the following section deal with a more security focused side of PowerShell in knowing what is being run on a system and also being able to log what is running so there is some sort of accountability in case something does go south.
In the case of a global transcript, we now have a group policy that can be enabled to allow complete transcript logging across all computers that receive it. This is much nicer than a per-user transcript logging that you would normally have that would write to their own home directories. To enable this, you would normally use the group policy management console (gpmc) and navigate down to the Computer configuration>Administrative Templates>Windows Components>Windows PowerShell. Within that you will see the setting for the Turn on PowerShell Transcriptions. Set the setting to Enabled. From there you can direct where the transcript logs will be outputted to and also decide if you want to include the invocation headers.
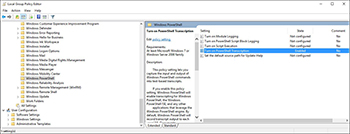
[Click on image for larger view.] Figure 4. Digging down to the policy object for transcript logging.
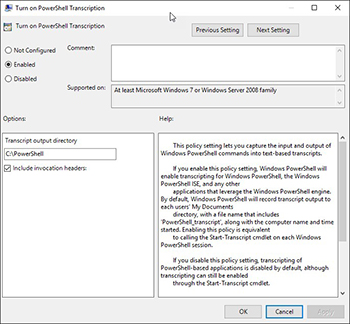 [Click on image for larger view.] Figure 5. Viewing the settings of the global transcript logging.
Once applied, the next time that you open up a PowerShell console, PowerShell ISE or use the PowerShell engine at all, there will be a logfile generated to the directory that was specified under a subfolder which contains the current date stamp when the transcript was initially started.
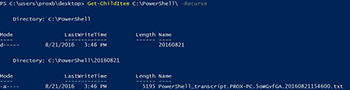 [Click on image for larger view.] Figure 6. The results of enabling the transcript logging.
Looking inside the transcript logfile, we can see everything that has occurred since the PowerShell engine has started up.
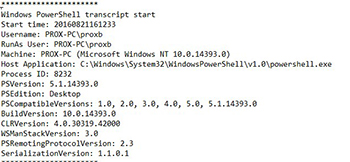 [Click on image for larger view.] Figure 7. Viewing the contents of the log file.
We get the usual information about the user and computer that PowerShell is being run from. Now every time a command is run, we will have a record of it and also a timestamp of when the command was run.
 [Click on image for larger view.] Figure 8. Looking at the commands run from within the logfile.
In closing, this is a great way to determine what was being run on a system and by who. If someone made a mistake with a command or ran the wrong command, you can go back to the transcripts and determine what had happened. It is advised that you set up some sort of access control lists (ACL) to ensure that someone could not go in and remove these to cover their tracks. In fact, the best way to ensure proper safe keeping of these would to send them to a network share that is write only to further keep these transactions safe from folks who might want to cause trouble on the network.
About the Author
Boe Prox is a Microsoft MVP in Windows PowerShell and a Senior Windows System Administrator. He has worked in the IT field since 2003, and he supports a variety of different platforms. He is a contributing author in PowerShell Deep Dives with chapters about WSUS and TCP communication. He is a moderator on the Hey, Scripting Guy! forum, and he has been a judge for the Scripting Games. He has presented talks on the topics of WSUS and PowerShell as well as runspaces to PowerShell user groups. He is an Honorary Scripting Guy, and he has submitted a number of posts as a to Microsoft's Hey, Scripting Guy! He also has a number of open source projects available on Codeplex and GitHub. His personal blog is at http://learn-powershell.net.