PowerShell How-To
Creating a VHD from a Physical Computer with Disk2vhd
Disk2Vhd is a little Microsoft utility that does one thing and one thing well: convert physical computers to virtual disks.
- By Adam Bertram
- 10/25/2018
One of the reasons that virtual machines took off in the past decade or so is because they make managing compute instances so easy.
With their inherent portability, snapshotting and other features, virtual machines are far superior to physical hardware when it comes to testing and speed of scale.
There are many instances, though, where an administrator would like to take advantage of the features of a virtual machine, but the instance currently sits on hardware.
Rather than rebuilding that instance from scratch, it's much more efficient to simply convert that physical instance to a virtual one. Luckily, we can do this free of charge for a Windows instance using the Disk2vhd utility by Sysinternals (Microsoft). Disk2vhd is a small utility that runs on a physical Windows computer, reads the disk(s) and then creates a virtual hard disk (VHD) from it.
Using the Disk2vhd utility is extremely easy. Once you have it downloaded, you'll then need to run it locally or transfer it to a remote computer you'd like to virtualize. Once you've done that, you have two options: You can either invoke the GUI or use the command line.
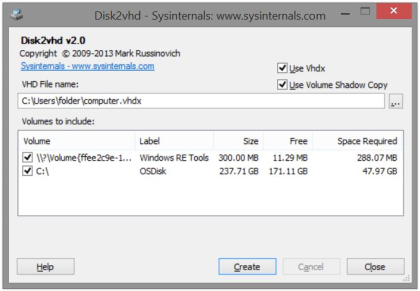
You can see from the screenshot above that the GUI has a single window. It allows you to select the volumes you'd like to be included in the VHD, whether you'd like to create a VHD or VHDX file, or use volume shadow copy or not. That's about it! Select the options you'd like and click Create.
Disk2vhd also has a command-line option. This comes in handy when you don't have access to the console or when you'd invoked Disk2vhd remotely over a PowerShell Remoting session, for example.
Using the command line is just about as easy. It has two parameters -- the volumes you'd like to convert and the path to the VHD file. The syntax for the CLI is:
disk2vhd <[drive: [drive:]...]|[*]> <vhdfile>
As an example, perhaps you'd like to convert all volumes on a computer and save it to a remote network share. You could invoke Disk2vhd like this:
disk2vhd * \\SERVER\Share\disk.vhd
There are a few caveats to using this utility, though. The first one is the Windows signature. Windows writes a signature to each disk that allows Windows to identify the disks. This means that you cannot mount the VHD on the same computer as the one it was converted from. Typically, this isn't a problem because the majority of the time, the originating VHD will be attached to a Hyper-V virtual machine running on another host.
The other problem with Disk2vhd is when it's invoked on a server with a high transaction load. For example, Exchange Server is known to be under a high transaction load. When Disk2vhd runs, it uses Volume Shadow Copy Service (VSS), which may affect data on the server.
I don't suggest using Disk2vhd on critical servers. This tool is excellent for creating test machines or virtualizing servers that may not be as heavily used.
Disk2Vhd is a great, little utility that does one thing and one thing well: convert physical computers to virtual disks. If you're looking for an easy and quick way to create a VHD(X) from a physical Windows instances, give Disk2vhd a shot.
About the Author
Adam Bertram is a 20-year veteran of IT. He's an automation engineer, blogger, consultant, freelance writer, Pluralsight course author and content marketing advisor to multiple technology companies. Adam also founded the popular TechSnips e-learning platform. He mainly focuses on DevOps, system management and automation technologies, as well as various cloud platforms mostly in the Microsoft space. He is a Microsoft Cloud and Datacenter Management MVP who absorbs knowledge from the IT field and explains it in an easy-to-understand fashion. Catch up on Adam's articles at adamtheautomator.com, connect on LinkedIn or follow him on Twitter at @adbertram or the TechSnips Twitter account @techsnips_io.