PowerShell How-To
How To Create a Simple Pester Test Report in HTML
You can force Pester to return output in XML rather than via the console. Here's how.
- By Adam Bertram
- 04/18/2019
Pester is a unit testing framework built into PowerShell that allows developers of all kinds to write unit, integration and acceptance tests across a wide range of situations. It's a tool that enables developers to write code in a domain-specific language (DSL) representing various kinds of tests.
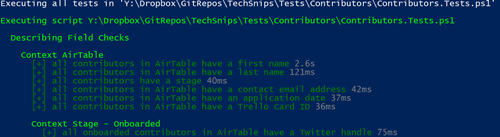
By default, when a Pester test is run, it returns output directly to the PowerShell console, as you can see below:
 [Click on image for larger view.] Example Pester output
The output is helpful, I suppose, with its red and green text indicating successes and failures, but it can get unwieldy when you need to parse through hundreds of tests. We can do better. We can force Pester to return an XML format known as nUnit that will tell Pester to return output in XML rather than via the console.
To follow along with this article, you'll need Pester via Install-Module Pester and a tool called ReportUnit to create the HTML. ReportUnit can be found on the Nuget.org page; click on Download Package, rename the nupkg file to ZIP, and then find the ReportUnit.exe file in the tools folder. Now you've got it.
To demonstrate using Pester and ReportUnit to build HTML reports, we first need to change up how we run the Invoke-Pester command. To do that, we need to use the OutputFormat parameter using the NUnitXml value along with the OutputFile parameter. This tells Pester to send all output in NUnitXml format to a file.
Since I don't care about output to the console anymore, I'll use the -Show None parameter combination to silence that, as well.
PS> Invoke-Pester -Path E:\techsnip\pestertest.ps1 -OutputFormat NUnitXml -OutputFile C:\Results\Tests.xml -Show None
Once the test suite has finished running, you'll notice a file called C:\Results\Tests.xml, which is all of your test results represented in XML. You now have a file that can be read with ReportUnit to convert to HTML.
I've extracted the ReportUnit.exe file from the Nuget package and placed it at C:\ReportUnit.exe. At its most basic, ReportUnit allows you to specify the folder name containing all of the XML files with your test results and a folder to save all of the HTML files it generates.
Below, I'm specifying the folder where my Tests.xml file is located (C:\Results), which ReportUnit will search for NUnit-formatted XML files. I'm then outputting all HTML files generated from all files found in that folder -- in my case, only one.
PS> C:\ReportUnit.exe C:\Results C:\

--
ReportUnit v1.50.0. Report generator for the test-runner family.
http://reportunit.relevantcodes.com/
Copyright (c) 2015 Anshoo Arora (Relevant Codes)
Developers:  Anshoo Arora, Sandra Greenhalgh
--

[2019.03.20 15:04:14][Info] The file C:\TestResults.xml contains NUnit test results
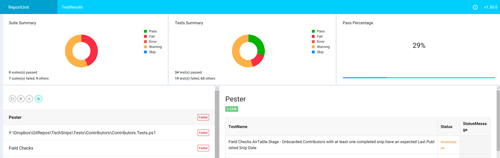
After this has run, you'll then see a TestResults.html file. Open that HTML file and you'll then see a beautiful dashboard representing the results of your tests:
 [Click on image for larger view.] ReportUnit output
As you can see, this particular set of tests has some major problems that I need to get started on fixing!
About the Author
Adam Bertram is a 20-year veteran of IT. He's an automation engineer, blogger, consultant, freelance writer, Pluralsight course author and content marketing advisor to multiple technology companies. Adam also founded the popular TechSnips e-learning platform. He mainly focuses on DevOps, system management and automation technologies, as well as various cloud platforms mostly in the Microsoft space. He is a Microsoft Cloud and Datacenter Management MVP who absorbs knowledge from the IT field and explains it in an easy-to-understand fashion. Catch up on Adam's articles at adamtheautomator.com, connect on LinkedIn or follow him on Twitter at @adbertram or the TechSnips Twitter account @techsnips_io.