PowerShell How-To
Creating a Custom Voice Font with Azure Cognitive Services
Using the custom voice feature in Microsoft's Azure Cognitive Services product, you can train a computer to sound like yourself -- or anyone else, for that matter.
- By Adam Bertram
- 06/04/2019
Do you remember the days of monotone, robotic-sounding speech-synthesis programs that tried but failed to "read" text and output that text to speech? I do, and it sounded terrible!
Nowadays, with the advent of artificial intelligence (AI) and machine learning, we can use AI to learn what sounds human and what sounds robotic to develop computer-generated voices that are extraordinarily hard to distinguish from a human voice.
Using the custom voice feature in Microsoft's Azure Cognitive Services product, you can now even train a computer to sound like yourself -- or anyone else, for that matter. Although a little scary, applications for this technology abound.
In this article, I'll show how you can create a custom voice from scratch. But first, I'll be assuming a few prerequisites: You will need to have a Microsoft Azure account and have already created an Azure Cognitive Services account (which you can do using PowerShell, as I demonstrate in this article).
The first step in creating your custom voice font is to link your Azure Cognitive Services subscription to the custom voice portal. To do that, head over to https://customvoice.ai. This URL will redirect you to the West US region URL. If your Azure subscription is not in the West US region, be sure to replace the "westus" in the URL to your subscription's region name.
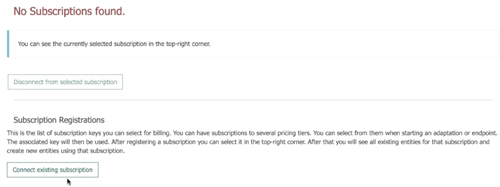
Once you do this, you'll then sign in and be presented with a subscription page. This is where you need to input your subscription key by clicking on Connect Subscription.
 [Click on image for larger view.]
Once you do this, you'll need to find your API key. To do that, head over to the Azure Portal and click into your Azure Cognitive Services account. Click on Keys and copy the Primary key.
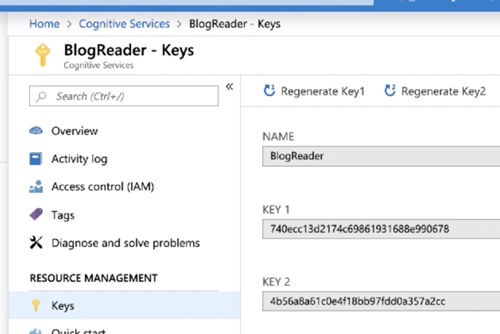
Once you have the key, paste the key into the Subscription key box in the custom voice portal to connect your Azure Cognitive Services account with the custom voice portal.
Now that you have your subscription linked, you'll need to build some training data. This topic alone could be an entire course on its own. Essentially, you need to follow the instructions in the Azure documentation to eventually come up with a set of .WAV files containing voice audio and a single transcript file containing references to each .WAV file with the text that is voiced.
For example, you may end up with:
1.wav
2.wav
3.wav
If so, your transcript file will look like this:
1   This is what is said in 1.wav
2   This is what is said in 2.wav
3   This is what is said in 3.wav
Once you've collected this information, create a .ZIP file containing all of the .WAV files. You now need to upload both the .ZIP file and transcription to the custom voice portal.
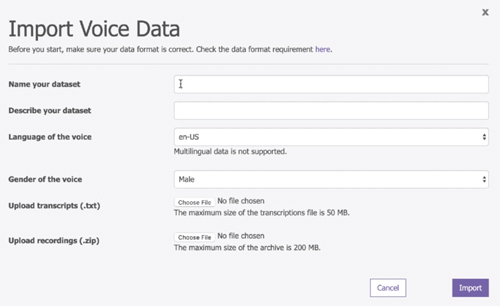
Inside of the custom voice portal, click on Custom Voice and then on Import Data. Here you will input the name, description, language and gender, and upload your training data set.
 [Click on image for larger view.]
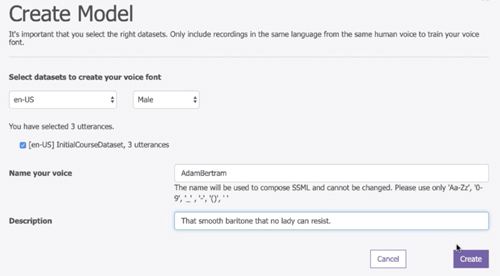
Once this is done, your voice data will be uploaded and ready to build your model. To create a model, click on the Models tab and on Create Model. Here is where you will input some necessary information about your model and begin creating.
 [Click on image for larger view.]
Now it's time to deploy your model. Click on Deploy to create an API endpoint and provide the name and description of your endpoint. Before you know it, your custom voice model will be deployed!
 [Click on image for larger view.]
It's now time to test your custom voice. On the same page in the custom voice portal, click on Test. This will bring you to a testing screen where you can input text and have your custom voice read the text. If it doesn't sound great, build more massive training datasets. Microsoft recommends thousands of utterances (.WAV files) to create a natural-sounding custom voice.
For more information, check out the Get Started with Custom Voice docs on Azure. Or, if you're into online courses, I've authored a Pluralsight course on the text-to-speech feature that contains a complete walk-through for building your own custom voice font.
About the Author
Adam Bertram is a 20-year veteran of IT. He's an automation engineer, blogger, consultant, freelance writer, Pluralsight course author and content marketing advisor to multiple technology companies. Adam also founded the popular TechSnips e-learning platform. He mainly focuses on DevOps, system management and automation technologies, as well as various cloud platforms mostly in the Microsoft space. He is a Microsoft Cloud and Datacenter Management MVP who absorbs knowledge from the IT field and explains it in an easy-to-understand fashion. Catch up on Adam's articles at adamtheautomator.com, connect on LinkedIn or follow him on Twitter at @adbertram or the TechSnips Twitter account @techsnips_io.