PowerShell Pipeline
Introduction to the Where Method in PowerShell
This feature, new to version 4 of PowerShell, will be a tool you use every day.
If you have been using PowerShell for a while, or even just picked it up yesterday, you have no doubt used Where-Object and ForEach-Object at some point in your scripting experience. The beauty of these cmdlets are that they allow you to take input via the pipeline and process each item in a collection one at a time to perform some sort of action (or you could use the ForEach keyword instead without piping). With Where-Object, you are filtering for specific items or filtering out unwanted things while in ForEach-Object, you are running additional commands against an object or preparing it for being outputted as part of another object. Either way, these are some of the most valuable commands outside of Get-Command, Get-Help and Get-Member.
If you aren't looking to piping everything into either of these cmdlets and wished that you had something else to accomplish what you wanted to do, then you will be happy to see that in PowerShell V4 the new methods Where() and ForEach() were introduced (to support Desired State Configuration) and you can now take advantage of in your day-to-day scripting! Note that I use method somewhat lightly as they do not behave as a typical method that you would see if you use something like Get-Member to see them. They are buried within PowerShell and only show up when working with collections.
These methods work more or less the same as the original way that you are used to with the exception that they happen at the end of a collection similar to what you would see with methods. Also, these methods come with a few tricks of their sleeve to make them even more useful than ever! As I mentioned, they only show up when you have a collection. If you just have a single item and try to use them, it will simply not be available to use.
Today's article will look at using .Where() in your day to day activities and will finish up by looking at using ForEach() in a follow-up article.
Getting Started with .Where()
I wanted to start with what I consider my favorite method of the two: .Where(). Note that I use the parenthesis that we would normally see with using methods, but I don't actually have to use them if I am just flat out filtering data like I normally would using Where-Object. All that I need to do is use the {} and it will work just fine.
If I wanted to get an idea of what is expected for this method, I could just call the method with parenthesis and view the error that is returned.
@().Where()
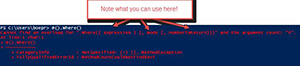 [Click on image for larger view.] Figure 1. Determine the use of Where by inspecting the error.
You can see that I can use my typical expression to filter data, but I also have a Mode and a numberToReturn members as well that I can work with. The numberToReturn is pretty self-explanatory as it will return only the number that you tell it to return.
First off is the simply filter using just the curly brackets.
@(1..10).Where{$_ -BAND 1}
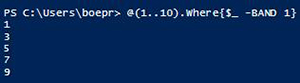 [Click on image for larger view.] Figure 2. Filtering for only odd numbers.
Nothing exactly mind blowing here, but this is a good starting point before we dive into more cool things that you can do with this method. One more approach using the numberToReturn member and then we can look at mode.
@(1..10).Where({$_ -BAND 1},'Default',2)
 [Click on image for larger view.] Figure 3. Filtering for only the first two odd numbers.
Note that I used "Default" as my mode member parameter only because I couldn't use $Null here. But "Default," as you may have guessed, just uses the same behavior that we are normally used to with Where-Object filtering.
I already mentioned the use of "Default" as one of the mode member parameters but we need to look at the rest of the group and see what we are working with. If you are wondering what the others might be, well, you can either add $null in place of the proper mode and it will return back all of the values of the System.Management.Automation.WhereOperatorSelectionMode enumeration or you can check out the handy table below to not only see what those values are, but also to better understand their purpose in life.
|
Name
|
Description
|
|
Default
|
Return all matches.
|
|
First
|
Stop processing after the first match.
|
|
Last
|
Return the last matching element.
|
|
SkipUntil
|
Skip until the condition is true, then return the rest.
|
|
Split
|
Return an array of two elements, first index is matched elements, second index is the remaining elements.
|
|
Until
|
Return elements until the condition is true then skip the rest.
|
The SelectionMode values here allow you to add some extra specifications to your filter based on your needs. We have already seen Default in action as it just handle the filtering like what you would expect but the other ones can definitely be useful to us as well.
I'm not going to step through each of these as some of them, such as First, really speak for themselves. In fact, I will only be showing examples of SkipUntil, Split and Until in my next examples. First and Last can work like Select-Object in that you can use those and then specify the numberToReturn to get back a set amount of data back.
SkipUntil
As the table says, this will skip all items in the filter until a condition is $True and then return the rest of the objects that was passed into the filter. This means that everything but whatever was before the filter will be shown.
@(1..10).Where({-NOT ($_ -BAND 1)},'SkipUntil')
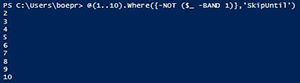 [Click on image for larger view.] Figure 4. Start displaying data after the first filtered item.
This example shows that I am skipping everything being passed into this filter up until the first even number, which happens to be 2. After that filter has been reached, it will return all of the data that was being passed to the method. If you might not be familiar enough with using the –BAND operator as a way to check if a value is odd or even (among its many other uses), the other example below shows how it will begin displaying data after finding 5.
@(1..10).Where({$_ -eq 5},'SkipUntil')
Split
This might be one of my favorite SelectionModes as you can split the returned data based on the filter into two collections. The uses for this one are many and one such example might be to determine what services are running and which ones are not running.
$Running,$Stopped = (Get-Service).Where({$_.Status -eq 'Running'},'Split')
Here we get back services that are running ($Running) and those which are stopped ($Stopped). Note that the data that is used to return from the filter will always be the first item in the collection while the remaining data will be in the second part of the collection.
Until
The last example for the Where method is Until, which will return all object until it reaches the result of the filter. Think the opposite of SkipUntil.
@(1..10).Where({$_ -eq 5},'Until')
 [Click on image for larger view.] Figure 5. Only display data until the first matched filter.
With that, we have covered some of what the Where() method is capable of. I'll wrap up my look at using the ForEach() method in a follow-up article.
About the Author
Boe Prox is a Microsoft MVP in Windows PowerShell and a Senior Windows System Administrator. He has worked in the IT field since 2003, and he supports a variety of different platforms. He is a contributing author in PowerShell Deep Dives with chapters about WSUS and TCP communication. He is a moderator on the Hey, Scripting Guy! forum, and he has been a judge for the Scripting Games. He has presented talks on the topics of WSUS and PowerShell as well as runspaces to PowerShell user groups. He is an Honorary Scripting Guy, and he has submitted a number of posts as a to Microsoft's Hey, Scripting Guy! He also has a number of open source projects available on Codeplex and GitHub. His personal blog is at http://learn-powershell.net.