PowerShell Pipeline
PowerShell Trend Reporting, Part 2: Send and Receive SQL Server Data
Here's how to track the data pulled from a query.
More on This Topic:
Having spent the last article showing how we can use WMI to perform a query for the current space on a drive, we need to take a it a step forward and begin tracking this data in a way that we can then go back to it and produce some reports that highlight the current trend of drive space or can be used to troubleshoot a steady increase in space over the course of a set amount of time.
The next step is to send the data that we want to collect to a SQL database. You will want to talk to your friendly neighborhood DBA to have them build a database and a table to use to store the data. Of course, if you are the DBA, you can quickly put a database together and be ready for the next step!
For my database table, I only need seven columns to store the data. They are:
- DateStamp: This is a timestamp so I can perform queries based on a specific date range
- Computername: This is what system that the data was gathered from
- VolumeName: I want to make sure that I know what volume each of these are coming from. This is useful if you have a specific naming convention for your drives
- DeviceID: Used to know what drive the data is coming from.
- Size: Total size of the disk.
- FreeSpace: Amount of space free on the drive
- UsedSpace: Total space used on drive
Of course, you can add other columns if you want such as the space used on a disk and anything else that you happen to see fit.
With that, it is time to make our connection to the SQL server and push some data to my database. In order to keep from relying on outside components, such as Server Management Objects (SMO), I am going to work with the System.Data.SqlClient.SQLConnection and System.Data.SqlClient.SqlCommand, which allows me to perform all of my SQL operations and it is extremely portable so I can run this from pretty much any system.
I can now look to make a connection to my SQL server and to the Master database long enough to build out a database and a table for my drive space data.
[string]$SqlServer  = ''

  [string]$Database  = 'Master'

  [int]$ConnectionTimeout  = 30

[int]$QueryTimeout  = 120
$conn=new-object System.Data.SqlClient.SQLConnection

  $ConnectionString = ("Server={0};Database={1};Integrated  Security=True;Connect Timeout={2}" -f  $SqlServer,$Database,$ConnectionTimeout)

  $conn.ConnectionString=$ConnectionString

$conn.Open()
#Create the database

  $Command = "Create Database Drive_Space"

  $cmd=new-object system.Data.SqlClient.SqlCommand($Command,$conn)

  $cmd.CommandTimeout=$QueryTimeout

  $cmd.ExecuteNonQuery()  | Out-Null
What is happening here is that I have specified some values in regards to what server I will be connecting to and the database that I want to connect to as well. I need to specify a connection string that will be used with my SQLConnection object. From there, I open the connection to the database and then build a query using Transact-SQL (T-SQL). In this case it is not so much a query but a statement to create the database. I add a query timeout in case it takes longer than what I would like and once that has completed, I make use of the ExecuteNonQuery() method to run the command.
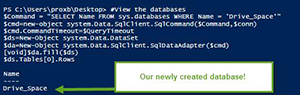
I can verify that the database is available by running the following command:
#View the database

  $Command = "SELECT Name FROM sys.databases WHERE Name =  'Drive_Space'"

  $cmd=new-object system.Data.SqlClient.SqlCommand($Command,$conn)

  $cmd.CommandTimeout=$QueryTimeout

  $ds=New-Object system.Data.DataSet

  $da=New-Object system.Data.SqlClient.SqlDataAdapter($cmd)

  [void]$da.fill($ds)

$ds.Tables[0].Rows
 [Click on image for larger view.]
This is slightly different than my previous command in that instead of using ExecuteNonQuery(), I build out a DataSet to hold all of the data that I plan on returning from my command.
Now that we have the database, the next step in this is to create the table, which I will call tbDriveSpace.
#Create the table

  $Command = "Use Drive_Space; CREATE TABLE tbDriveSpace  (DateStamp datetime,ComputerName varchar (50), DeviceID text, VolumeName  varchar (50),Size bigint ,FreeSpace bigint, UsedSpace bigint)"

  $cmd=new-object system.Data.SqlClient.SqlCommand($Command,$conn)

  $cmd.CommandTimeout=$QueryTimeout

  $cmd.ExecuteNonQuery()  | Out-Null

  #Close the connection

$conn.Close()
So did that work out ok? I assume so because no errors were returned, but we can find out using the following code to perform a query against Information.Schema.Tables in SQL:
#View the databases

  $Command = "SELECT * FROM information_schema.tables"

  $cmd=new-object system.Data.SqlClient.SqlCommand($Command,$conn)

  $cmd.CommandTimeout=$QueryTimeout

  $ds=New-Object system.Data.DataSet

  $da=New-Object system.Data.SqlClient.SqlDataAdapter($cmd)

  [void]$da.fill($ds)

$ds.Tables[0].Rows
 [Click on image for larger view.]
Looks like everything is great! We can now begin the process of taking the data that are collecting on drive space and begin sending it to our newly created database. I will take the same steps that I have showed you in making the SQL connection to the database and then performing a T-SQL Update command to add the information collected.
[string]$SqlServer  = 'Boe-PC'

  [string]$Database  = 'Drive_Space'

  [int]$ConnectionTimeout  = 30

  [int]$QueryTimeout  = 120

  [string]$Computer  = $env:COMPUTERNAME

$Date = (Get-Date).ToString()
Write-Verbose ("Creating  SQL Connection to {0}" -f $sqlServer)

  $conn=new-object System.Data.SqlClient.SQLConnection

  $ConnectionString = ("Server={0};Database={1};Integrated  Security=True;Connect Timeout={2}" -f  $SqlServer,$Database,$ConnectionTimeout)

  $conn.ConnectionString=$ConnectionString

  $conn.Open()


  #WMI hashtable for splatting

  $WMI =  @{

  Filter =  "DriveType='3' AND (Not Name LIKE  '\\\\?\\%')"

  Class =  "Win32_Volume"

  ErrorAction =  "Stop"

  Property =  "Name","Label","Capacity","FreeSpace"

}
If (Test-Connection  -ComputerName $Computer  -Count 1 -Quiet) {

  Try {

  $WMI['Computername'] = $Computer

  $Data  = @(Get-WmiObject  @WMI)

  $Data  | ForEach {

  Write-Verbose  ("{0}-{1}: Updating in SQL database"  -f $Computer,$_.Name)

  $Command  = "INSERT  INTO [tbDRIVESPACE] (DateStamp, Computername, DeviceID, VolumeName, Size,  FreeSpace, UsedSpace) `

  VALUES ('$($Date)', '$($Computer)', '$($_.Name)', '$($_.Label -replace  `"'`",`"`")', '$($_.Capacity)', '$($_.FreeSpace)', '$($_.Capacity - $_.FreeSpace)')"

  $cmd=new-object system.Data.SqlClient.SqlCommand($Command,$conn)

  $cmd.CommandTimeout=$QueryTimeout

  $cmd.ExecuteNonQuery() |  Out-Null

  }

  } Catch  {

  Write-Warning  ("{0}: {1}" -f $Computer, $_.Exception.Message)

  }

  }
Write-Verbose ("Closing  connections")

  $conn.Close()

  $conn.Dispose()
This script is tuned to query just a single system for drive space and then sends that data off to a SQL database where it can be used later on in providing reports or viewing the drive space during a certain period of time if needed. The only difference in this script and what I have been using during this article and my last one is that the T-SQL statement is different by using an INSERT command and supplying my drive space data so it goes into the proper column.
Using a similar approach that I had with a query to verify the table existed, I am going simply modify the T-SQL statement in pulling the data in my SQL database back down so I can not only verify the data, but can then use that data to put together reports.
[string]$SqlServer  = $env:COMPUTERNAME

  [string]$Database  = 'Drive_Space'

  [int]$ConnectionTimeout  = 30

[int]$QueryTimeout  = 120
$conn=new-object System.Data.SqlClient.SQLConnection

  $ConnectionString = ("Server={0};Database={1};Integrated  Security=True;Connect Timeout={2}" -f  $SqlServer,$Database,$ConnectionTimeout)

  $conn.ConnectionString=$ConnectionString

$conn.Open()
#View the databases

  $Command = "SELECT * FROM tbDriveSpace"

  $cmd=new-object system.Data.SqlClient.SqlCommand($Command,$conn)

  $cmd.CommandTimeout=$QueryTimeout

  $ds=New-Object system.Data.DataSet

  $da=New-Object system.Data.SqlClient.SqlDataAdapter($cmd)

  [void]$da.fill($ds)

  $ds.Tables[0].Rows
#Close the connection

  $conn.Close()
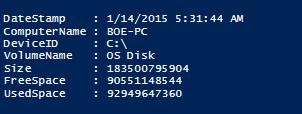
In this case, I only have one object returned because I ran this script a single time. But over the course of days, months and years this will obviously grow into more data being returned and more useful data at that! With that in mind, I am going to set this up as a scheduled job so it can run hourly and update my database so I can begin tracking my disk usage and see if I am trending one way or the other or maybe staying pretty flat in my space usage.
I'll be wrapping up this series in my next article by taking this data and generating reports that can b used to track drive space trends. Until then, see you later!
About the Author
Boe Prox is a Microsoft MVP in Windows PowerShell and a Senior Windows System Administrator. He has worked in the IT field since 2003, and he supports a variety of different platforms. He is a contributing author in PowerShell Deep Dives with chapters about WSUS and TCP communication. He is a moderator on the Hey, Scripting Guy! forum, and he has been a judge for the Scripting Games. He has presented talks on the topics of WSUS and PowerShell as well as runspaces to PowerShell user groups. He is an Honorary Scripting Guy, and he has submitted a number of posts as a to Microsoft's Hey, Scripting Guy! He also has a number of open source projects available on Codeplex and GitHub. His personal blog is at http://learn-powershell.net.